Kia Stinger CK: Engine Control System / Variable Charge Motion Actuator (VCMA)
Components and components location
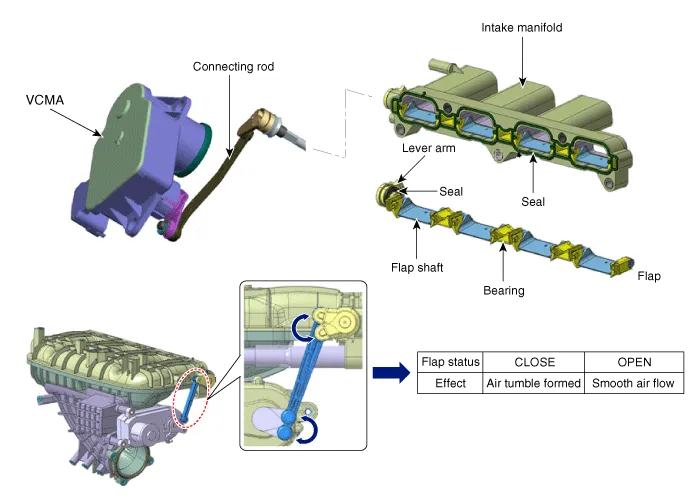
ECM directly controls the actuator and the rotation of motor operates the VCM
flap of intake manifold in link structure to create tumble in air. Mounted inside
the actuator, the motor and position sensor sense the position of flap and send
feedback to ECM to determine the current location of flap and detect abnormal operation
due to adherence of foreign substance.
Description and operation
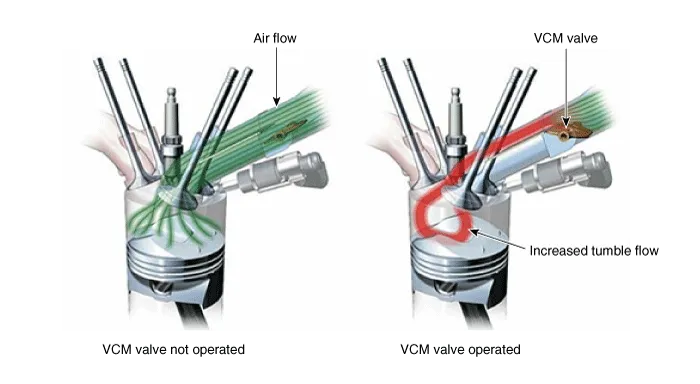
Variable charge motion actuator reinforces the tumble of the air that flows inside
the cylinder, improves combustion performance, and enhances engine torque and fuel
efficiency in low to mid speed range. ECM drives ON/OFF the motor to control the
VCMA. VCMA is usually "Closed" and creates tumble for the air intake when vehicle
is started. When vehicle accelerates and reaches approx. 2,600 rpm, actuator operates
VCM flap (Open) and facilitates the flow of air intake.
Schematic diagrams
Harness Connector
Repair procedures
| 1. |
Switch "OFF" the ignition and disconnect the negative (-) battery terminal.
|
| 2. |
Remove the intake manifold.
(Refer to Engine Mechanical System - “Intake Manifold”)
|
| 3. |
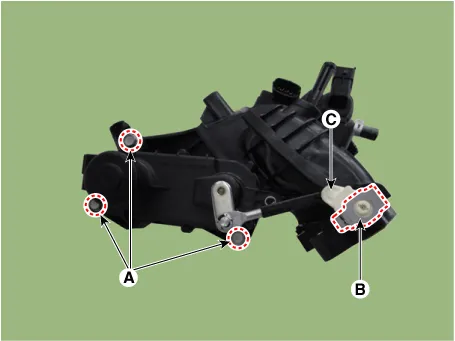
Remove the variable charge motion actuator mounting bolts (A).
|
| 4. |
Remove VCMA rod clip (B) and connection link between flap (C) using screwdriver.
|
| 1. |
Install in the reverse order of removal.
|
VCMA mounting bolt :
9.8 - 11.8 N·m (1.0 - 1.2 kgf·m, 7.2 - 8.7 lb·ft)
|
|
Make sure that groove part of the connection link is pointing
upward when mounting VCMA.
|
|
|
After replacing the VCMA (Variable Charge Motion Actuator) or intake
manifold, be sure to delete the previous VCMA adative value by performing
the 'resetting adaptive values' procedure using KDS.
|
|
VCMA learning procedure is performed automatically while driving but
manual learning procedure is also available for immediate access to proper
operation.
| 1) |
Push the accelerator pedal at 2,500 engine rpm for 2-3 seconds
and then idle the engine.
|
| 2) |
Repeat the no. 1 procedure three times.
|
| 3) |
Switch "OFF" the ignition.
|
|
| 1. |
Switch "OFF" the ignition.
|
| 2. |
Connect the KDS to Data Link Connector (DLC).
|
| 3. |
Switch "ON" the ignition.
|
| 4. |
Select "Vehicle, Model year, Engine, System".
|
| 5. |
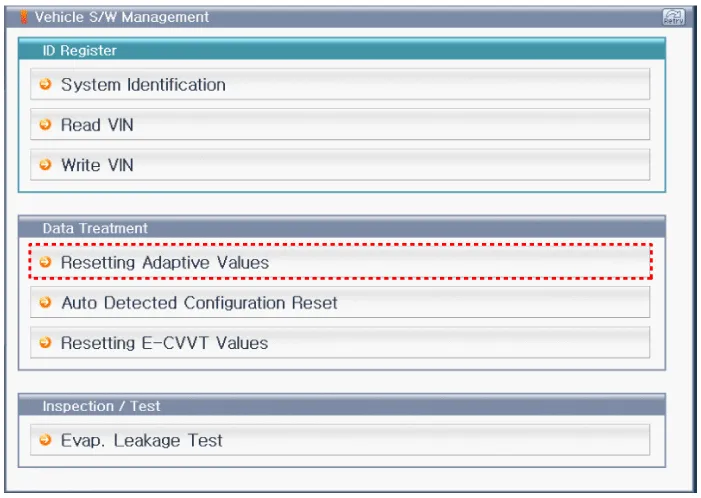
Select "Vehicle S/W Management".
|
| 6. |
Delete the previous VCMA adaptive value by selecting "Resetting Adaptive
Values".
|
| 7. |
Press [Reset] when ready.
|
Other information:
Kia Stinger (CK) 2018-2023 Service Manual: Purge Control Solenoid Valve (PCSV)
Specifications
Specification
Item
Specification
Coil Resistance (Ω)
18.5 - 22.5 [20°C(68°F)]
Description and operation
Description
Installed on the surge tank, the Purge Control Solenoid Valve (PCSV) controls
the passage between the canister and the intake manifold.
Kia Stinger (CK) 2018-2023 Service Manual: Fuse/relay panel description
■ Driver’s side fuse panel
■ Engine compartment fuse panel
■ Rear fuse box panel
■ Battery box fuse panel
Inside the fuse/relay panel covers, you can find the fuse/relay label describing
fuse/relay name and capacity.
✽ NOTICE
Not all fuse panel descriptions in this manual may be applicable to your vehicle.
It is accurate at the time of printing.



