
Kia Stinger CK: Engine Control System / CVVT Oil Temperature Sensor (OTS)
Specifications
| Specification |
|
Temperature [°C (°F)] |
Resistance (kΩ) |
|
-40 |
52.15 |
|
-20 |
28.82 |
|
0 |
14.08 - 19.45 |
|
20 |
2.16 - 2.78 |
|
40 |
1.11 |
|
60 |
0.54 |
|
80 |
0.26 - 0.32 |
|
100 |
0.16 |
|
120 |
0.1 |
|
140 |
0.06 |
Description and operation
| Description |
Continuous Variable Valve Timing (CVVT) system advances or retards the valve timing of the intake and exhaust valve in accordance with the ECM control signal calculated by the engine speed and load.
By controlling CVVT, the valve over-lap or under-lap occurs, which in turn improves fuel efficiency, reduces exhaust gases (NOx, HC) and improves engine performance by reducing pumping loss, generating internal EGR effect, improving combustion stability, improving volumetric efficiency and increasing expansion work.
This system consists of the CVVT Oil Control Valve (OCV) which supplies the engine oil to the cam phaser or runs out the engine oil from the cam phaser in accordance with the ECM PWM (Pulse With Modulation) control signal, the CVVT Oil Temperature Sensor (OTS) which measures the engine oil temperature, and the Cam Phaser which varies the cam phase by using the hydraulic force of the engine oil.
The engine oil released from the CVVT oil control valve varies the cam phase in the direction (Intake Advance/Exhaust Retard) or opposite direction (Intake Retard/Exhaust Advance) of the engine rotation by rotating the rotor connected with the camshaft inside the cam phaser.

Schematic diagrams
| Circuit Diagram |

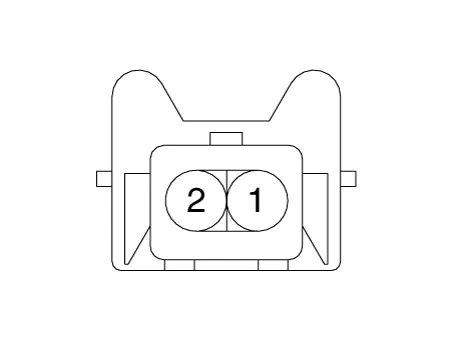
Harness Connector
Repair procedures
| Inspection |
| 1. |
Switch "OFF" the ignition. |
| 2. |
Disconnect the OTS connector. |
| 3. |
Remove the OTS. |
| 4. |
After immersing the thermistor of the sensor into engine coolant, measure resistance between the OTS terminals 1 and 2. |
| 5. |
Check that the resistance is within the specification.
|
| Removal |
| 1. |
Switch "OFF" the ignition and disconnect the negative (-) battery terminal. |
| 2. |
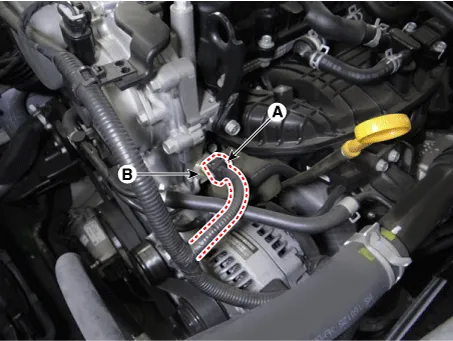
Disconnect the oil temperature sensor connector (A). |
| 3. |
Remove the oil temperature sensor (B).
|
| Installation |
| 1. |
Install in the reverse order of removal.
|


Other information:
Kia Stinger (CK) 2018-2023 Service Manual: How to use the Smart Liftgate
The liftgate can be opened with notouch activation satisfying all the conditions below. After 15 seconds when all doors are closed and locked Positioned in the detecting area for more than 3 seconds. ✽ NOTICE • The Smart Liftgate does not operate when: - The smart key is detected within 15 seconds after the doors are closed and locked, and is continuously detected.Kia Stinger (CK) 2018-2023 Service Manual: Around View Monitor (AVM) Switch
Repair procedures Removal Put on gloves to protect your hands. • When prying with a flat-tip screwdriver or use a prying trim tool, wrap it with protective tape, and apply protective tape around the related parts, to prevent damage.Categories
- Manuals Home
- Kia Stinger Owners Manual
- Kia Stinger Service Manual
- New on site
- Most important about car
