Kia Stinger CK: Drive Belt System / Drive Belt Tensioner
Kia Stinger (CK) 2018-2023 Service Manual / Engine Mechanical System / Drive Belt System / Drive Belt Tensioner
Repair procedures
| Removal and Installation |
| 1. |
Remove the drive belt. (Refer to Drive Belt System - "Drive Belt") |
| 2. |
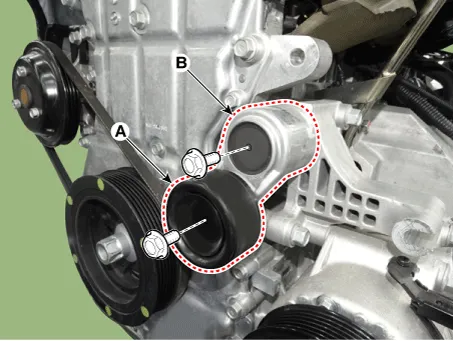
Remove the drive belt auto tensioner pulley (A).
|

| 3. |
Remove the drive belt tensioner (B).
|
| 4. |
Install in the reverse order of removal. |


Other information:
Kia Stinger (CK) 2018-2023 Service Manual: Lap/shoulder belt
Height adjustment You can adjust the height of the shoulder belt anchor to one of 4 positions for maximum comfort and safety. The height of the adjusting seat belt should not be too close to your neck. You will not be getting the most effective protection. The shoulder portion should be adjusted so that it lies across your chest and midway over your shoulder near the door and not your neck.Kia Stinger (CK) 2018-2023 Service Manual: Forward Collision-avoidance Assist (FCA)
The FCA system (if equipped) is designed to detect and monitor a vehicle ahead or detect a pedestrian in the roadway through radar signals and camera recognition to warn the driver that a collision is imminent, and if necessary, apply emergency braking. WARNING - Forward Collision-Avoidance assist (FCA) Limitations The FCA system is a supplemental system and is not a substitute for safe driving practices.Categories
- Manuals Home
- Kia Stinger Owners Manual
- Kia Stinger Service Manual
- New on site
- Most important about car

Copyright © 2026 www.kstinger.com 0.0095