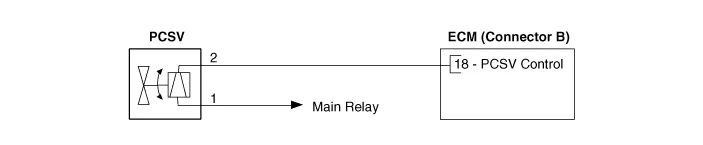
Kia Stinger: AVN System / External AMP

Kia Stinger CK 2018-2024 Service Manual / Body Electrical System / AVN System / External AMP

Components and components location
Components
[Mobis]

Connector Pin Information

No.
Connector A
Connector B
1
Battery (+)
Rear door left speaker (+)
2
Battery (+)
Rear door left speaker (-)
3
Battery (+)
Rear door right speaker (+)
4
Battery (+)
Rear door right speaker (-)
5
-
Reserved
6
Multimedia-CAN (High)
-
7
Multimedia-CAN (Low)
-
8
ACC
-
9
Amplifier navigation voice (+)
-
10
-
-
11
-
-
12
Front door left speaker (+)
-
13
Front door left speaker (-)
-
14
Front door right speaker (+)
-
15
Front door left speaker (-)
-
16
Ground
Subwoofer speaker 1 (+)
17
Ground
Subwoofer speaker 1 (-)
18
Ground
Subwoofer speaker 2 (+)
19
Ground
Subwoofer speaker 2 (-)
20
Amplifier SPDIF (High)
-
21
Amplifier SPDIF (Low)
-
22
Amplifier SPDIF (Ground)
-
23
Amplifier navigation voice (-)
-
24
IGN1
-
25
Front center speaker (+)
-
26
Front center speaker (-)
-
27
-
-
28
-
-

[Harman]

No.
Connector A
Connector B
1
Battery (+)
Subwoofer speaker 2 (+)
2
Battery (+)
Subwoofer speaker 1 (+)
3
Battery (+)
Front door right speaker (+)
4
Battery (+)
Front door left speaker (+)
5
-
-
6
Multimedia-CAN (High)
-
7
Multimedia-CAN (Low)
-
8
ACC
-
9
Amplifier navigation voice (+)
-
10
-
-
11
-
-
12
-
Rear door right speaker (+)
13
Front door center speaker (+)
Rear door left speaker (+)
14
Front door right tweeter speaker (+)
Surround right speaker (+)
15
Front door left tweeter speaker (+)
Surround left speaker (+)
16
Ground
Subwoofer speaker 2 (-)
17
Ground
Subwoofer speaker 1 (-)
18
Ground
Front door right speaker (-)
19
Ground
Front door left speaker (-)
20
Amplifier SPDIF (High)
-
21
Amplifier SPDIF (Low)
-
22
Amplifier SPDIF (Ground)
-
23
Amplifier navigation voice (-)
-
24
IGN1
-
25
-
Rear door right speaker (-)
26
Front door center speaker (-)
Rear door left speaker (-)
27
Front door right tweeter speaker (-)
Surround right speaker (-)
28
Front door left tweeter speaker (-)
Surround left speaker (-)

Repair procedures
Removal
1.

Disconnect the negative (-) battery terminal.

2.

Remove the luggage side trim [RH].

(Refer to Body - "Luggage Side Trim")

3.

Disconnect the external amplifier connectors (A).

4.

Remove the external amplifier (A) after loosening the mounting nuts.

Installation
1.

Install the external amplifier after connecting the connectors.

2.

Install the luggage side trim [RH].

3.

Connect the negative (-) battery terminal.


Make sure that the external amplifier connectors are plugged in properly.

Check the AVN system for normal operation.

Inspection
  

Warning and guide sounds regarding engine start and driving are generated by the external amplifier. Please refer to the following:

(Instrument Cluster and Gauge - Refer to "Instrument Cluster")

When the external amplifier or speakers are replaced with other products, a failure may occur in the amplifier and warning and guide sounds (excluding the ETCS guide sound) may not be generated.

Virtual engine sound inside the vehicle (occurs in Sport mode) is generated by the external amplifier. Therefore, if the external amplifier or speakers are replaced with other products, a failure may occur in the amplifier and virtual engine sound may not be generated properly.

1.

In the body electrical system, failure can be quickly diagnosed by using the vehicle diagnostic system (KDS).

(1)

Self diagnosis : Checking failure and code number (DCT).

(2)

Current data : Checking the system input/output data state.

(3)

Actuation test : Checking the system operation condition.

(4)

Additional function : Controlling other features including system option setting and zero point adjustment

2.

Select the 'Car model' and the system to be checked in order to check the vehicle with the tester.

3.

Select the 'Amplifier' to check the AVN.

4.

Select the 'Current data" menu to search the current state of the input/output data.

The input/output data for the sensors corresponding to the Amplifier can be checked.

AVN Front Monitor
Components and components location Components Repair procedures Removal    • ...

AVN Antenna
Components and components location Components Schematic diagrams Circuit Diagram [Radio + GPS] [Radio + GPS + DAB] [Radio + GNSS + eCall] Repair procedur ...

Other information:

Kia Stinger CK 2018-2024 Service Manual: Rear Glass Defogger Printed Heater


Repair procedures Inspection    • Wrap tin foil around the end of the voltmeter test lead to prevent damaging the heater line. Apply pressure on the tin foil with hand and move the t ...

Kia Stinger CK 2018-2024 Service Manual: TJ Joint


Repair procedures Replacement    • Special grease must be applied to the driveshaft joint. Do not substitute with another type of grease. • The ...

Copyright © www.kstinger.com 2015-2024