
Kia Stinger CK: Wipers and washers / Windshield wipers
Contents:
Operates as follows when the ignition switch is turned ON.
MIST : For a single wiping cycle, move the lever to this (MIST) position and release it. The wipers will operate continuously if the lever is held in this position.
OFF : Wiper is not in operation
INT : Wiper operates intermittently at the same wiping intervals. Use this mode in light rain or mist. To vary the speed setting, turn the speed control knob.
LO : Normal wiper speed
HI : Fast wiper speed
✽ NOTICE
If there is heavy accumulation of snow or ice on the windshield, defrost the windshield for about 10 minutes, or until the snow and/or ice is removed before using the windshield wipers to ensure proper operation. If you do not remove the snow and/or ice before using the wiper and washer, it may damage the wiper and washer system.
Auto control
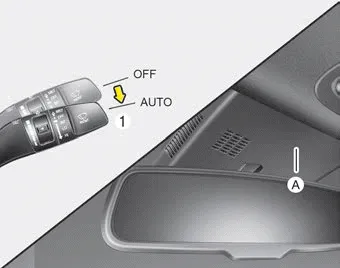
The rain sensor (A) located on the upper end of the windshield glass senses the amount of rainfall and controls the wiping cycle for the proper interval. The more it rains, the faster the wiper operates. When the rain stops, the wiper stops.
To vary the speed setting, turn the speed control knob (1).
If the wiper switch is set in AUTO mode when the ignition switch is ON, the wiper will operate once to perform a self-check of the system. Set the wiper to OFF position when the wiper is not in use.
WARNING
When the ignition switch is ON and the windshield wiper switch is placed in the AUTO mode, use caution in the following situations to avoid any injury to the hands or other parts of the body:
- Do not touch the upper end of the windshield glass facing the rain sensor.
- Do not wipe the upper end of the windshield glass with a damp or wet cloth.
- Do not put pressure on the windshield glass.
CAUTION
- When washing the vehicle, set the wiper switch in the OFF position to stop the auto wiper operation. The wiper may operate and be damaged if the switch is set in the AUTO mode while washing the vehicle.
- Do not remove the sensor cover located on the upper end of the passenger side windshield glass. Damage to system parts could occur and may not be covered by your vehicle warranty.
- When starting the vehicle in winter, set the wiper switch in the OFF position. Otherwise, wipers may operate and ice may damage the windshield wiper blades. Always remove all snow and ice and defrost the windshield properly prior to operating the windshield wipers.


Other information:
Kia Stinger (CK) 2018-2023 Owner's Manual: Evaporator Temperature Sensor
Description and operation Description The evaporator temperature sensor detects the evaporator core temperature and interrupts compressor relay power in order to prevent evaporator from freezing by excessive cooling. Repair procedures Inspection 1. Turn the ignition switch OFF. 2. Disconnect the evaporator temperature sensor connector.Components and components location Components 1. Radiator 2. Radiator upper hose 3. Radiator lower hose 4. Radiator upper mounting bracket (RH) 5. Radiator upper mounting bracket (LH) 6. Radiator lower mounting insulator (RH) 7. Radiator lower mounting insulator (LH) Repair procedures Removal and Installation 1.Categories
- Manuals Home
- Kia Stinger Owners Manual
- Kia Stinger Service Manual
- New on site
- Most important about car
Contents
