Kia Stinger CK: Forward Collision-avoidance Assist (FCA) / FCA front radar / camera sensor
Contents:

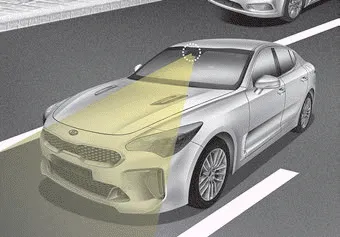
In order for the FCA system to operate properly, always make sure the sensor or sensor cover is clean and free of dirt, snow, and debris. Dirt, snow, or foreign substances on the lens may adversely affect the sensing performance of the sensor.
✽ NOTICE
- Do not install any accessories, such as a license plate bracket or bumper sticker near the sensor area. Do not replace the bumper by yourself. Doing so may adversely affect the sensing performance.
- Always keep the sensor/bumper area clean.
- Use only a soft cloth to wash the vehicle. Also, do not spray highly pressurized water on the sensor installed on the bumper.
- Be careful not to apply unnecessary force on the frontal sensor area. When the sensor moves out of the correct position due to external force, the system may not operate correctly and may not provide a warning light or message. In this case, we recommend you have the vehicle inspected by an authorized Kia dealer.
- Use only the genuine Kia sensor cover. Do not arbitrarily apply paint on the sensor cover.
- Do not tint the window or install stickers, or accessories around the inside mirror where the camera is installed.
- Make sure the frontal camera installation point does not get wet.
- Do not impact or arbitrarily remove any radar/camera components.
- Do not place reflective objects(white paper or mirror etc.) on the dashboard. The system may activate unnecessarily due to reflection of the sunlight.
- Excessive audio system volume may prevent occupants from hearing the FCA system warning alarm.
Warning message and warning light
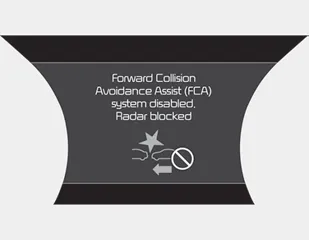
When the sensor is covered or the sensor lens is dirty with foreign substances, such as snow or rain, the FCA system may not be able to detect vehicles or pedestrians. In this case, a warning message ("Forward Collision Avoidance Assist (FCA) system disabled. Radar blocked") will appear to notify the driver. Remove the foreign substances to allow the FCA system to function.
Remove any dirt, snow, or debris and clean the radar sensor cover before operating the FCA system.
The FCA may not properly operate in an area (e.g. open terrain), where any substances are not detected after turning ON the engine.


Other information:
Kia Stinger (CK) 2018-2023 Owner's Manual: Steering Gear box
Components and components location Components 1. Tie rod end 2. R-MDPS motor Repair procedures Removal 1. Remove wheel nuts, front wheel and tire (A) from hub. Tightening torque : 107.9 - 127.5 N·m (11.0 - 13.0 kgf·m, 79.6 - 94.0 lb·ft) Be careful not to damage the wheel bolts when removing the wheel and tire (A).Driver`s seat (1) Driver position memory system* (2) Forward and backward (3) Seatback angle (4) Seat cushion height (5) Lumbar support (6) Cushion extension (7) Seat back bolster control (8) Headrest Front Passenger`s seat (9) Forward and backward (10) Seatback angle (11) Seat cushion height (12) Lumbar support (13) Headrest Rear seat (14) Armrest (15) Headrest (16) Seatback folding lever WARNING - Loose objects Do not place anything in the driver's foot well or under the front seats.Categories
- Manuals Home
- Kia Stinger Owners Manual
- Kia Stinger Service Manual
- New on site
- Most important about car
Contents
