Kia Stinger CK: Features of your vehicle / Wipers and washers
Contents:

A : Wiper speed control (front)
· MIST – Single wipe
· OFF – Off
· INT – Intermittent wipe
AUTO* – Auto control wipe
· LO – Low wiper speed
· HI – High wiper speed
B : Intermittent control wipe time adjustment
C :Wash with brief wipes (front)*
Windshield wipers ➤
Front windshield washers
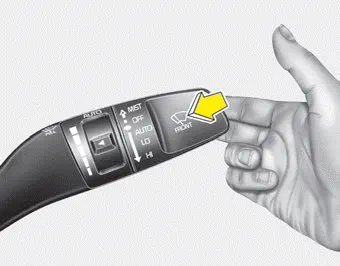
In the OFF position, pull the lever gently toward you to spray washer fluid on the windshield and to run the wipers 1-3 cycles.
Use this function when the windshield is dirty.
The spray and wiper operation will continue until you release the lever.
If the washer does not work, check the washer fluid level. If the fluid level is not sufficient, you will need to add appropriate non-abrasive windshield washer fluid to the washer reservoir.
The reservoir filler neck is located in the front of the engine compartment on the passenger side.
CAUTION - Washer pump
To prevent possible damage to the washer pump, do not operate the washer when the fluid reservoir is empty.
WARNING - Obscured visibility
Do not use the washer in freezing temperatures without first warming the windshield with the defrosters; the washer solution could freeze on the windshield and obscure your vision.
CAUTION - Wipers & windshields
- To prevent possible damage to the wipers or windshield, do not operate the wipers when the windshield is dry.
- To prevent damage to the wiper blades, do not use gasoline, kerosene, paint thinner, or other solvents on or near them.
- To prevent damage to the wiper arms and other components, do not attempt to move the wipers manually.


Other information:
Kia Stinger (CK) 2018-2023 Owner's Manual: Auto Defoging Actuator
Description and operation Description Installed on the windshield glass, the auto defogging sensor judges and sends signal to blow out wind for defogging if moisture occurs. The air conditioner control module receives a signal from the sensor and restrains moisture and eliminates defog by the intake actuator, A/C, auto defogging actuator, blower motor rpm and mode actuator.Components and components location Component Location 1. Cowl side trim Repair procedures Replacement Put on gloves to protect your hands. • When prying with a flat-tip screwdriver or using a prying trim tool, wrap protective tap around the tool and related parts to prevent damage.Categories
- Manuals Home
- Kia Stinger Owners Manual
- Kia Stinger Service Manual
- New on site
- Most important about car
Contents
