
Kia Stinger CK: ISG (Idle Stop & Go) System / Door switch
Description and operation
| Description |
Via the seat belt/door switch, the ISG function can detect if the driver side seat belt is fastened and the driver side door is closed. If the driver side seat belt/door are not fastened/closed, the ISG system will not operate. If the seat belt/door are unfastened/opened, the engine will not start or stop by the ISG function for safety reasons.
Repair procedures
| Inspection |
Front Door Lock Module Inspection
| 1. |
Remove the front door trim. (Refer to Body - "Front Door Trim") |
| 2. |
Remove the front door module. (Refer to Body - "Front Door Module") |
| 3. |
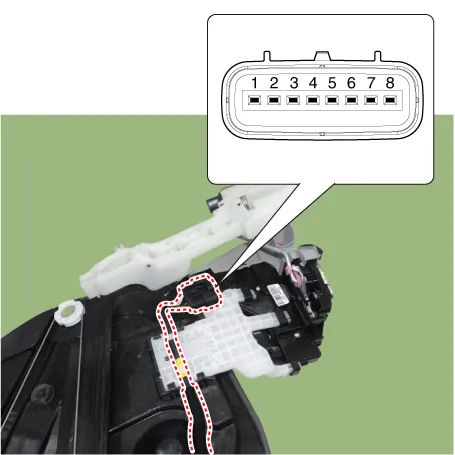
Disconnect the connector from the actuator.
[Central Lock]
[Dead Lock]
|
||||||||||||||||||||||||||||||||||||||||||||||||||||||||||
| 4. |
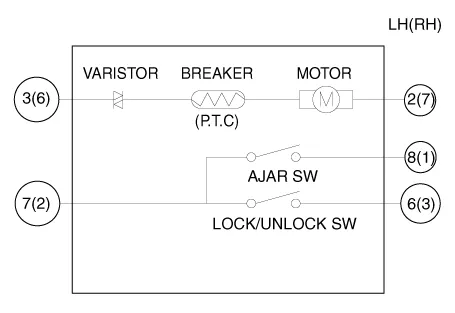
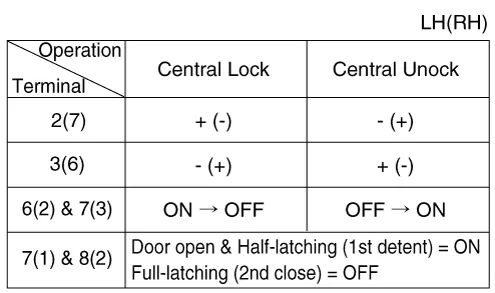
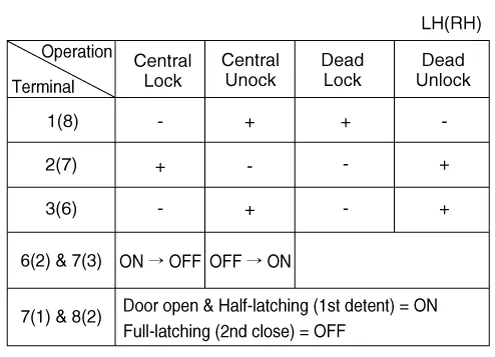
Check actuator operation by connecting power and ground as shown below. To prevent damage to the actuator, apply battery voltage only momentarily. [Central Lock (Without key switch)]
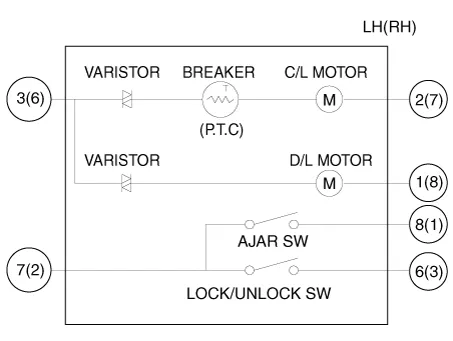
[Dead Lock (Without Key Switch)]
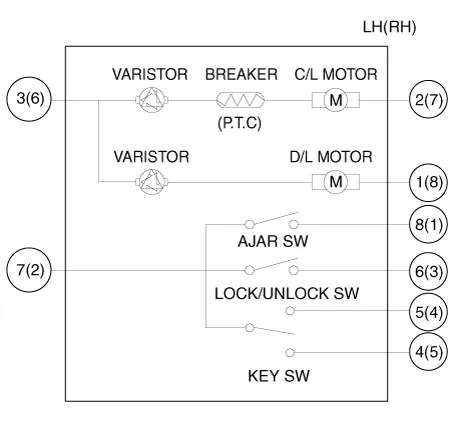
[Dead Lock (With Key Switch)]
[Central Lock]
[Dead Lock]
|
| Installation |
| 1. |
Install in the reverse order of removal. |


Other information:
Kia Stinger (CK) 2018-2023 Service Manual: Warning And Caution Labels
General information Warning And Caution Labels 1. Fan caution 2. Radiator cap caution 3. Battery caution Battery Caution Label Warning / Caution Label (Cont'd) A. Keep lighted cigarettes and all other flames or sparks away from the battery. B.Kia Stinger (CK) 2018-2023 Service Manual: Blind-Spot Collision Warning (BCW) Warning Lamp
Components and components location Components 1. Side repeater lamp 2. BCW Indicator 3. AVM Camera 4. Puddle lamp Repair procedures Removal 1. Disconnect the negative (-) battery terminal. 2. Remove mirror (A) to the direction as shown in the picture using (-) screw driver.Categories
- Manuals Home
- Kia Stinger Owners Manual
- Kia Stinger Service Manual
- New on site
- Most important about car
