Kia Stinger CK: Engine And Transmission Assembly / Engine Mounting
Components and components location
| Components |

| 1. Engine mounting support bracket
(LH) 2. Engine mounting support bracket (RH) 3. Engine mounting bracket (LH) |
4. Engine mounting bracket (RH)
5. Transmission mounting bracket (AWD) 6. Transmission mounting bracket (2WD) |
Repair procedures
| Removal and Installation |
Engine Mounting Bracket
| 1. |
Remove the engine room front under cover and engine room side cover. (Refer to Engine and Transmission Assembly - "Engine Room Under Cover") |
| 2. |
Disconnect the universal joint assembly from the shaft joint. (Refer to Steering System - "Steering Column and Shaft") |
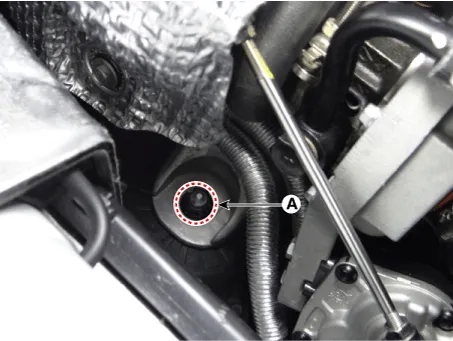
| 3. |
Remove the engine mounting support bracket nut (A).
[LH]
[RH]
|

| 4. |
Install the jack to the edge of the oil pan to support the engine.
|


| 5. |
Lift the engine slightly using the jack to obtain space for removing the engine mounting. |
| 6. |
Remove the engine mounting bracket (A).
[LH]
[RH]
|


| 7. |
Install in the reverse order of removal. |
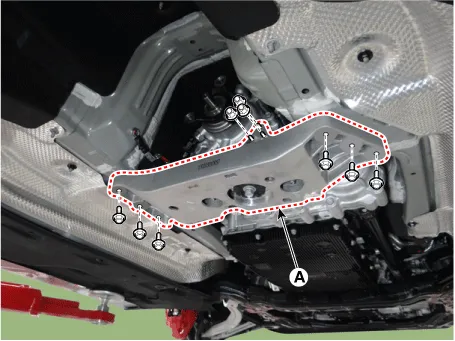
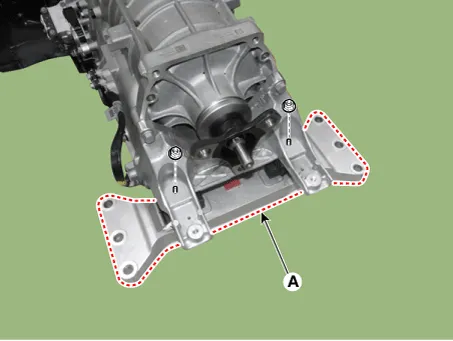
Transmission mounting bracket (AWD)
| 1. |
Remove the engine room rear under cover. (Refer to Engine and Transmission Assembly - "Engine Room Under Cover") |
| 2. |
Install the jack under the transmission to support the transmission.
|

| 3. |
Remove the transmission mounting bracket (A).
|
| 4. |
Install in the reverse order of removal. |
Transmission mounting bracket (2WD)
| 1. |
Remove the engine room rear under cover. (Refer to Engine and Transmission Assembly - "Engine Room Under Cover") |
| 2. |
Install the jack under the transmission to support the transmission.
|
| 3. |
Remove the transmission mounting bracket mounting bolts (A).
|
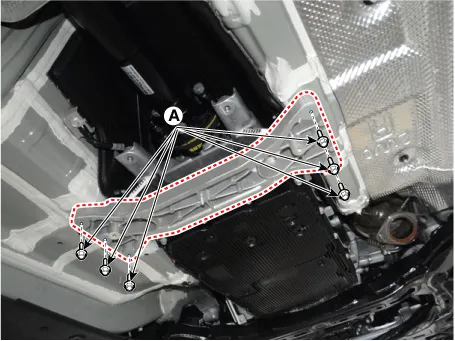
| 4. |
Remove the transmission mounting bracket (A).
|
| 5. |
Install in the reverse order of removal. |


Other information:
Kia Stinger (CK) 2018-2023 Service Manual: Changing tires
1. Park on a level surface and apply the parking brake firmly. 2. Place the transaxle shift lever in P (Park). 3. Activate the hazard warning flashers. 4. Remove the wheel lug nut wrench, jack and spare tire from the vehicle. 5. Block both the front and rear of the wheel that is diagonally opposite from the jack position. WARNING - Jack location To reduce the possibility of injury, be sure to use only the jack provided with the vehicle in the correct jack position; never use any other part of the vehicle for jack support.Kia Stinger (CK) 2018-2023 Service Manual: Curtain Airbag (CAB) Module
Description and operation Description Installed inside the headliner, the curtain airbags (CAB) protect the driver and passengers from danger in the eThe SRSCM determines deployment of curtain airbag based on side impact sensor (SIS) signal.The SRSCM determines deployment of curtain airbag by using side impact sensor (SIS) signal.Categories
- Manuals Home
- Kia Stinger Owners Manual
- Kia Stinger Service Manual
- New on site
- Most important about car
