Kia Stinger CK: Power Train / Drive Belt
Repair procedures
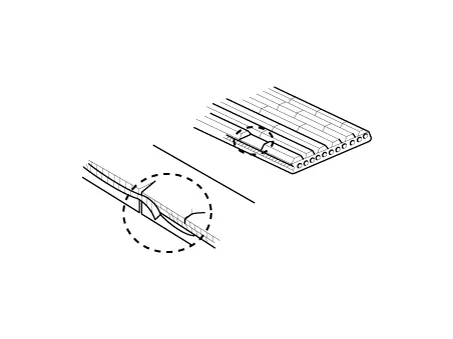
| Inspection |
| 1. |
Check belt for maintenance and abnormal wear of V-ribbed part. Replace if necessary.
|

| 2. |
Visually check the belt for excessive wear, frayed cords etc. If any defect has been found, replace the drive belt.
|


Other information:
Kia Stinger (CK) 2018-2023 Service Manual: Floor Console
Components and components location Components 1. Console complete 2. Floor console tray 3. Console upper complete 4. Lever boots 5. Console storage box matKia Stinger (CK) 2018-2023 Service Manual: Recognizing vehicles
The sensor may be limited when: - The radar or the camera is contaminated with foreign substances. - It heavily rains or snows. - There is electromagnetic interference. - Something in the path of travel deflects the radar waves. - The vehicle in front has a narrow body. (i.e. motor cycle and bicycle) - The driver's view is not clear due to backlight, reflected light, or darkness.Categories
- Manuals Home
- Kia Stinger Owners Manual
- Kia Stinger Service Manual
- New on site
- Most important about car

Copyright © 2026 www.kstinger.com 0.0104