
Kia Stinger CK: Maintenance / Chassis
Contents:
- Brake/Clutch Fluid
- Disc Brakes and Pads
- Drive Shafts and Boots
- Parking Brake
- Steering Gear Rack, Linkage and Boots
- Suspension Ball Joints
- Suspension Mounting Bolts
- Tire (pressure & tread wear)
Brake/Clutch Fluid
Repair procedures
| Inspection |
Check the brake fluid level in the brake fluid reservoir. The level should be between “MIN” and “MAX” marks on the side of the reservoir.
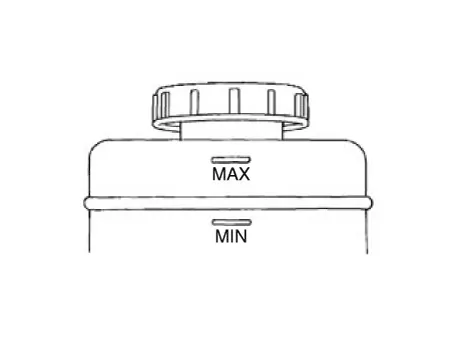
Use only hydraulic brake fluid conforming to DOT 3 or DOT 4 specification.
Check the brake system for any leakage if the fluid level is extremely low (lower than MIN).
Disc Brakes and Pads ➤
Drive Shafts and Boots
Repair procedures
| Inspection |
| 1. |
Check the drive shaft boots for loose clamps, cracks, grease leaks, kinks or damage.
|

Parking Brake
Repair procedures
| Inspection |
Check whether the stroke is within specification when the parking brake pedal is depressed with 66 lb, 294 N(30 kg) of force. Also, the parking brake alone should securely hold the vehicle on a fairly steep grade. If the stroke is more or less than specified, have the parking brake adjusted by an authorized Kia dealer.
|
Stroke : 6 - 7 notch |
Steering Gear Rack, Linkage and Boots ➤
Suspension Ball Joints
Repair procedures
| Inspection |
Visually check to be sure that there are no flaws and cracks that may cause injury.
Suspension Mounting Bolts
Repair procedures
| Inspection |
Visually check for loose mounting bolts.
Tire (pressure & tread wear) ➤


Other information:
Kia Stinger (CK) 2018-2023 Service Manual: Button Engine Start System
Components and components location Component Location 1. Integrated body control unit (IBU) 2. Interior antenna 1 3. Interior antenna 2 4. Tailgate open switch 5. Bumper antenna 6. Tailgate antenna 7. Buzzer 8. Start Stop Button (SSB) 9. Door handle & door antenna 10. FOB key Schematic diagrams Circuit Diagram Description and operation Description System Overview The System offers the following features: – Changing the state of engine ignition and power by using the start button.Service data Specifications Item Specification Type Motor Driven Power Steering Steering gear Type Rack & Pinion Rack stroke 2WD : 152.0 ± 1 mm (5.9842 ± 0.0393 in.) AWD : 146.0 ± 1 mm (5.7480 ± 0.Categories
- Manuals Home
- Kia Stinger Owners Manual
- Kia Stinger Service Manual
- Brake/Clutch Fluid
- Disc Brakes and Pads
- Drive Shafts and Boots
- Parking Brake
- Steering Gear Rack, Linkage and Boots
- Suspension Ball Joints
- Suspension Mounting Bolts
- Tire (pressure & tread wear)
- New on site
- Most important about car
Contents
