Kia Stinger: Tail Gate / Tail Gate Latch
Components and components location

1. Tailgate latch assembly
|
|
Repair procedures
|
Wear gloves to protect hands from injury.
|
| • |
Use a plastic panel removal tool to remove interior trim pieces
without marring the surface.
|
| • |
Take care not to bend or scratch the trim and panels.
|
|
| 1. |
Remove the tailgate trim.
(Refer to tailgate - "tailgate Trim")
|
| 2. |
Disconnect the tailgate latch connector (A).
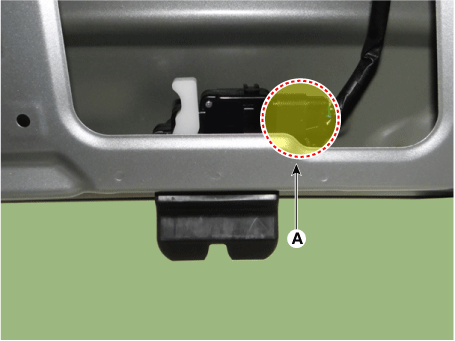
|
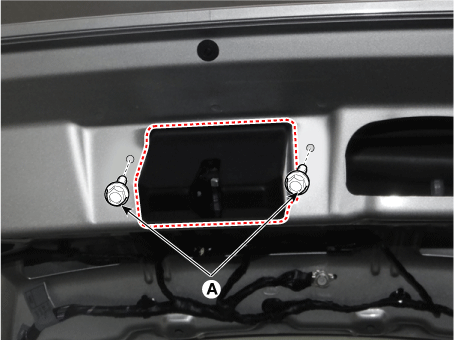
| 3. |
Remove the tailgate latch assembly after loosening the mounting bolts
(A).
|
| 4. |
Install in the reverse order of removal.
| •
|
Make sure the tail gate locks/unlocks and opens/closes
properly.
|
| •
|
Adjust the tail gate alignment.
|
| •
|
Make sure the connectors are connected in properly.
|
| •
|
Replace any damaged clips.
|
|
|
Components and components location
Component Location
1. Tailgate trim
2. Tailgate side trim [LH]
3. Tailgate upper trim
4. Tailgate side trim [RH]
...
Repair procedures
Replacement
Do not apply sealant to the body.
1.
Using a screwdriver, re ...
Other information:
Specifications
Specification
Pressure [kPa (kgf/cm², psi)]
Output Voltage (V) [Vref = 5V]
50 (0.51, 7.3)
0.3
600 (6.12, 87.0)
2.5
1100 (11.2, 159.5)
4.5
...
Components and components location
Component Location
1. Hood latch release handle
Repair procedures
Replacement
1.
After loosening the mounting screw, remove the hood latch release handle
(A).
...


 Tail Gate Trim
 Tail Gate Lift