Kia Stinger CK: ECS(Electronic Control Suspension) System / ECS-G Sensor
Repair procedures
| Removal |
[Body G Sensor]
| Front |
| 1. |
Turn ignition switch OFF and disconnect the negative (-) battery cable. |
| 2. |
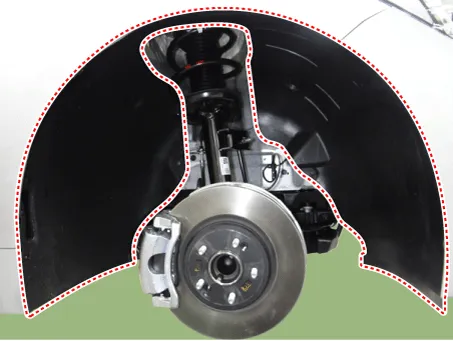
Remove wheel nuts, wheel and tire (A) from hub.
|


| 3. |
Remove the front wheel guard. (Refer to Body - "Front wheel guard") |
| 4. |
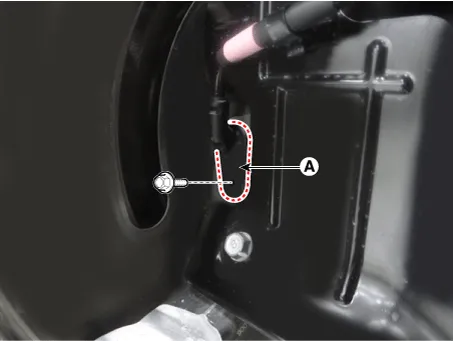
Disconnect the ECS-G sensor connector (A). |
| 5. |
Loosen the nut and then ECS-G sensor (B). [RH,LH]
|

| 6. |
Install in the reverse order of removal. |
| Rear |
| 1. |
Turn ignition switch OFF and disconnect the negative (-) battery cable. |
| 2. |
Remove wheel nuts, wheel and tire (A) from hub.
|
| 3. |
Remove the rear wheel guard. (Refer to Body - "Rear wheel guard") |
| 4. |
Disconnect the ECS-G sensor connector (A). |
| 5. |
Loosen the nut and then ECS-G sensor (B). [RH]
|

| 6. |
Install in the reverse order of removal. |
| [Wheel-G Sensor] |
| [Front] |
| 1. |
Turn ignition switch OFF and disconnect the negative (-) battery cable. |
| 2. |
Remove wheel nuts, wheel and tire (A) from hub.
|
| 3. |
Remove the front wheel guard.
|
| 4. |
Loosen the wheel speed sensor bolt (A) and then disconnect the wheel speed sensor.
|
| 5. |
Remove the wheel speed sensor bracket (A).
|
| 6. |
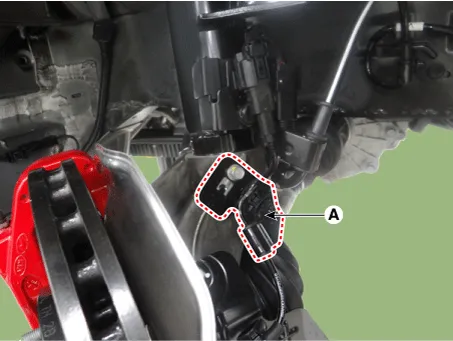
Disconnect the ECS connector (A) and then remove the wheel speed sensor bracket.
|

| 7. |
Remove the bracket (A) and then disconnect the connector (B).
|

| 8. |
Install in the reverse order of removal. |
[Rear]
| 1. |
Turn ignition switch OFF and disconnect the negative (-) battery cable. |
| 2. |
Remove wheel nuts, wheel and tire (A) from hub.
|
| 3. |
Remove the rear wheel guard. (Refer to Body - "Rear wheel guard") |
| 4. |
Loosen the wheel speed sensor bolt and then remove the wheel speed sensor.
|

| 5. |
Disconnect the ECS sensor connector (A) and then remove the bracket (B).
|

| 6. |
Install in the reverse order of removal. |


Other information:
Kia Stinger (CK) 2018-2023 Service Manual: Corrosion protection
Protecting your vehicle from corrosion By using the most advanced design and construction practices to combat corrosion, we produce vehicles of the highest quality. However, this is only part of the job. To achieve the long-term corrosion resistance your vehicle can deliver, the owner's cooperation and assistance is also required. Common causes of corrosion The most common causes of corrosion on your vehicle are: Road salt, dirt and moisture that is allowed to accumulate underneath the vehicle.Kia Stinger (CK) 2018-2023 Service Manual: Engine Room Under Cover
Repair procedures Removal and Installation Engine Room Front Under Cover. 1. Remove the engine room front under cover (A). Tightening torque : 7.8 - 11.8 N·m (0.8 - 1.2 kgf·m, 5.8 - 8.7 lb·ft) 2. Install in the reverse order of removal. Engine Room Rear Under Cover.Categories
- Manuals Home
- Kia Stinger Owners Manual
- Kia Stinger Service Manual
- New on site
- Most important about car
