Kia Stinger CK: Fuel Delivery System / Fuel Pressure Sensor (FPS)
Specifications
| Specification |
|
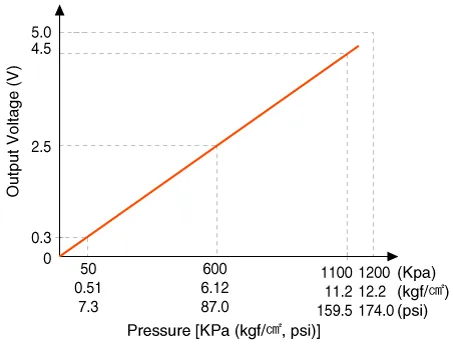
Pressure [kPa (kgf/cm², psi)] |
Output Voltage (V) [Vref = 5V] |
|
50 (0.51, 7.3) |
0.3 |
|
600 (6.12, 87.0) |
2.5 |
|
1100 (11.2, 159.5) |
4.5 |
Description and operation
| Description |
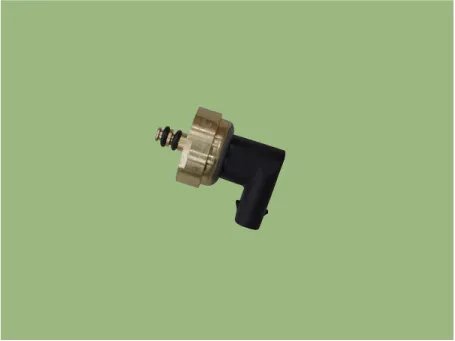
Installed on top of the low pressure fuel pump, the fuel pressure sensor (FPS) measures the pressure in the low pressure line.
Based on the fuel pressure measured by the FPS and the fuel consumption, the fuel pump control module (FPCM) determines whether to activate the low pressure fuel pump.
After activating the low pressure fuel pump, the FPS continues to send the fuel pressure to the FPCM and the FPCM keeps controlling the fuel flow rate using the feedback from the FPS.
Schematic diagrams
| Circuit Diagram |

| Terminal Information |
| Terminal Illustration |

| Terminal Function |
|
No. |
Function |
Connected to |
|
1 |
Fuel Pressure sensor (FPS) power supply |
Fuel Pressure sensor (FPS) |
|
2 |
Fuel Pressure sensor (FPS) ground |
Fuel Pressure sensor (FPS) |
|
3 |
Fuel Pressure sensor (FPS) signal input |
Fuel Pressure sensor (FPS) |
Repair procedures
| Inspection |
| 1. |
Connect the KDS on the Data Link Connector (DLC). |
| 2. |
Check the output voltage of fuel pressure sensor (FPS).
|
| Removal |
| 1. |
Release the residual pressure in fuel line. (Refer to the Fuel Delivery System - "Release Residual Pressure in Fuel Line") |
| 2. |
Switch "OFF" the ignition and disconnect the negative (-) battery terminal. |
| 3. |
Remove the rear seat cushion. (Refer to Body - "Rear Seat Assembly") |
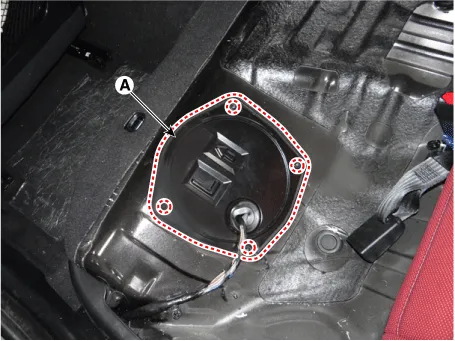
| 4. |
Remove the fuel pump service cover (A) after loosening the mounting screws.
|
| 5. |
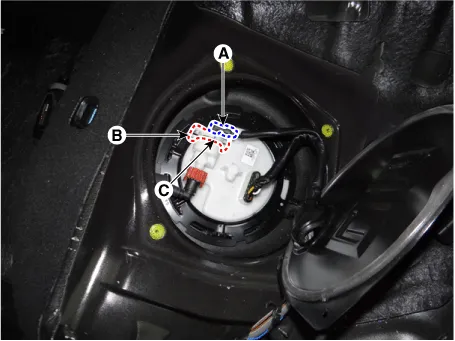
Disconnect the fuel feed quick-connector (A). |
| 6. |
Remove the fuel pressure sensor fixing pin (B). |
| 7. |
Remove the fuel pressure sensor from the fuel pump.
|
| Installation |
| 1. |
Install in the reverse order of removal. |


Other information:
Kia Stinger (CK) 2018-2023 Service Manual: Rear Upper Arm
Repair procedures Removal [Rear upper arm rear] 1. Remove wheel nuts, wheel and tire (A) from hub. Tightening torque: 107.9 - 127.5 N·m (11.0 - 13.0 kgf·m, 79.6 - 94.0 lb·ft) Be careful not to damage the wheel bolts when removing the wheel and tire (A).Kia Stinger (CK) 2018-2023 Service Manual: Driver position memory system
Driver Position Memory System is the facility that enables driver’s seat, leg extension, steering wheel, exterior mirrors, cluster and head-up display (HUD) to be controlled with a simple button operation, which allows a driver to recall memorized driving positions and automatically control them. - Driver’s seat/Leg extension/Steering Wheel/Exterior mirrors: Location - Cluster: Brightness of lighting - Head Up Display (HUD): Height, rotation and brightness.Categories
- Manuals Home
- Kia Stinger Owners Manual
- Kia Stinger Service Manual
- New on site
- Most important about car
