Kia Stinger CK: AVN System / AVN Head Unit
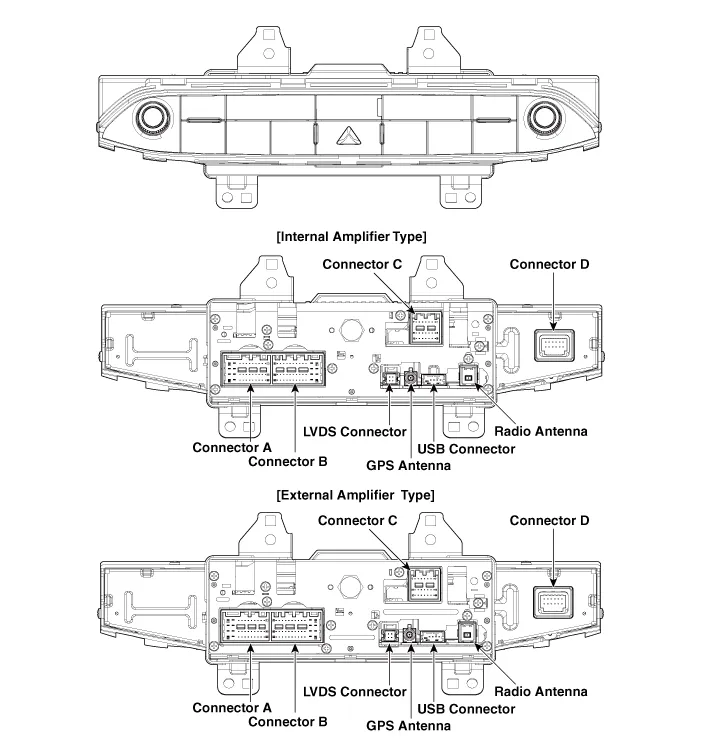
Components and components location
| Components |
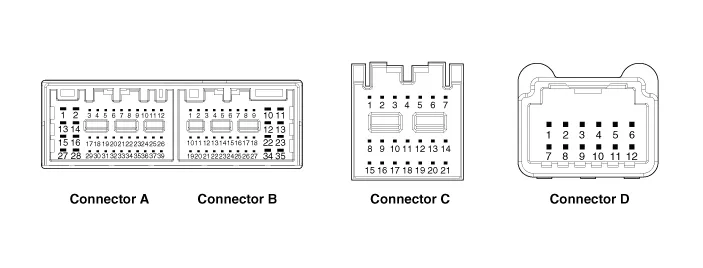
Connector Pin Information
|
No. |
Connector A |
Connector B |
Connector C |
Connector D |
|
|
Internal Amplifier |
External Amplifier |
||||
|
1 |
Rear door left speaker (+) |
- |
- |
- |
Ground |
|
2 |
Rear door left speaker (-) |
- |
MIC (+) |
- |
- |
|
3 |
- |
Amplifier navigation voice (+) |
- |
- |
Hazard switch |
|
4 |
- |
Amplifier_SPDIF (High) |
- |
- |
Passenger seat belt reminder |
|
5 |
- |
Antenna power |
- |
- |
|
|
6 |
RVM Camera : Power |
Illumination (+) |
- |
Telltale/PAB Off |
|
|
AVM Camera : - |
|||||
|
7 |
RVM Camera : Video |
Multimedia-CAN (High) |
- |
IGN1 |
|
|
AVM Camera : Video (Y) |
|||||
|
8 |
RVM Camera : - |
Monitor board_enable |
- |
PAB On |
|
|
AVM Camera : Video (C) |
|||||
|
9 |
- |
- |
- |
- |
|
|
10 |
AUX Audio right_input |
Battery (+) |
- |
- |
|
|
11 |
AUX_Detect |
Battery (+) |
- |
- |
|
|
12 |
Steering wheel key |
Ground |
- |
Hazard lamp |
|
|
13 |
Front door left speaker (+) |
- |
Ground |
- |
|
|
14 |
Front door left speaker (-) |
- |
MIC Ground |
- |
|
|
15 |
Front door right speaker (-) |
- |
MIC (-) |
- |
|
|
16 |
Front door right speaker (+) |
- |
RVM Camera : - |
- |
|
|
AVM Camera : Equipment_Detect |
- |
||||
|
17 |
- |
Amplifier navigation voice (-) |
- |
- |
|
|
18 |
- |
Amplifier SPDIF (Low) |
- |
- |
|
|
19 |
- |
Amplifier SPDIF (Ground) |
Illumination (-) |
- |
|
|
20 |
RVM Camera : Power ground |
Multimedia-CAN (Low) |
- |
||
|
AVM Camera : - |
- |
||||
|
21 |
RVM Camera : Video ground |
Display_Mute |
- |
||
|
AVM Camera : Video (Y) ground |
|||||
|
22 |
RVM Camera : - |
ACC |
|
||
|
AVM Camera : Video (C) ground |
|||||
|
23 |
- |
- |
|||
|
24 |
AUX Audio left_input |
LCD Battery |
|||
|
25 |
AUX Audio ground |
- |
|||
|
26 |
Steering wheel remote controller (Ground) |
- |
|||
|
27 |
Rear door right speaker (-) |
- |
- |
||
|
28 |
Rear door right speaker (+) |
- |
- |
||
|
29 |
- |
- |
|||
|
30 |
- |
- |
|||
|
31 |
- |
- |
|||
|
32 |
RVM Camera : - |
- |
|||
|
AVM Camera : Equipment_Detect |
- |
||||
|
33 |
RVM Camera : - |
IGN1 |
|||
|
AVM Camera : Video (Y) shield |
|||||
|
34 |
RVM Camera : - |
- |
|||
|
AVM Camera : Video (C) shield |
|||||
|
35 |
- |
LCD Ground |
|||
|
36 |
- |
|
|
|
|
|
37 |
- |
||||
|
38 |
Vehicle Speed |
||||

Repair procedures
| Removal |
| 1. |
Disconnect the negative (-) battery terminal. |
| 2. |
Remove the heater & A/C control unit. (Refer to Heating,Ventilation And Air Conditioning - "Heater & A/C Control Unit (DATC)") |
| 3. |
Remove the crash pad passenger side panel. (Refer to Body - "Crash Pad Center Panel") |
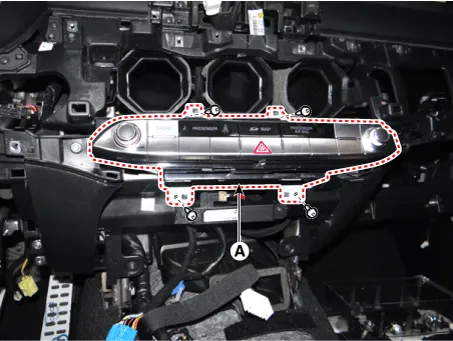
| 4. |
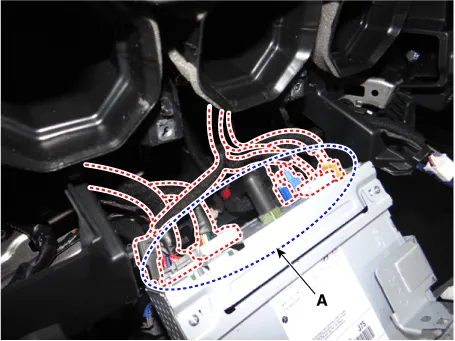
Remove the AVN head unit (A) after loosening the mounting screws.
|
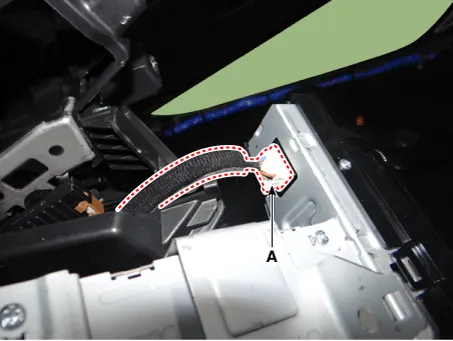
| 5. |
Remove the AVN head unit after disconnecting the connectors and antenna cable (A).
|
| Installation |
| 1. |
Install the AVN head unit after connecting the AVN head unit connectors and cable. |
| 2. |
Install the crash pad passenger side panel. |
| 3. |
Connect the negative (-) battery terminal. |
|


Other information:
Kia Stinger (CK) 2018-2023 Service Manual: LCD Modes
(1) SPORT mode (if equipped) This mode displays Gauge, Lap Timer, G-Force. (2) Trip Computer mode This mode displays driving information such as the tripmeter, fuel economy, and so on. ❈ For more details, refer to “Trip Computer” in this chapter. (3) Turn by Turn mode (if equipped) This mode displays the state of the navigation. (4) LKA/SCC mode (if equipped) This mode displays the state of the Smart Cruise Control (SCC) and Lane keeping Assist (LKA).Kia Stinger (CK) 2018-2023 Service Manual: How does the air bag system operate?
Air bags are activated (able to inflate if necessary) only when the Engine Start/Stop button is turned to the ON or engine is running. The appropriate air bags inflate instantly in the event of a serious frontal collision or side collision in order to help protect the occupants from serious physical injury. There is no single speed at which the air bags will inflate.Categories
- Manuals Home
- Kia Stinger Owners Manual
- Kia Stinger Service Manual
- New on site
- Most important about car
