
Kia Stinger CK: Features of your vehicle / Fuel filler lid
Contents:
Opening the fuel filler lid
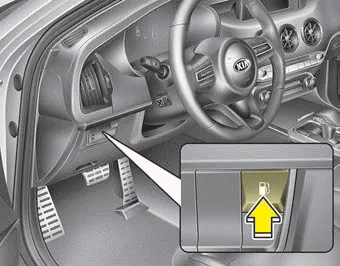
The fuel filler lid must be opened from inside the vehicle by pressing the fuel filler lid opener button.
If the fuel filler lid does not open because ice has formed around it, tap lightly or push on the lid to break the ice and release the lid. Do not pry on the lid. If necessary, spray around the lid with an approved de-icer fluid (do not use radiator anti-freeze) or move the vehicle to a warm place and allow the ice to melt.
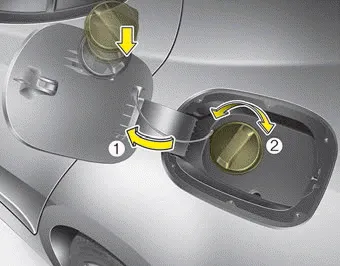
1. Stop the engine.
2. To open the fuel filler lid, push the fuel filler lid opener button.
3. Pull open the fuel filler lid (1).
4. To remove the cap, turn the fuel filler cap (2) counterclockwise.
5. Refuel as needed.
Closing the fuel filler lid
1. To install the cap, turn it clockwise until it “clicks” once. This indicates that the cap is securely tightened.
2. Close the fuel filler lid and push it in lightly making sure that it is securely closed.
✽ NOTICE
There may be an intermittent noise near the refueling hole while the engine is idling if the fuel cap is not closed securely. This occurs normally with the OBD system.
✽ NOTICE
When refueling on unlevel ground, the fuel gauge may not point to the F position.
It is not a malfunction. If you move your vehicle to a level ground, the fuel gauge will move to the full position.
Emergency fuel filler lid release ➤


Other information:
Kia Stinger (CK) 2018-2023 Owner's Manual: Horn
Components and components location Component Location 1. Horn switch 2. Horn relay (Built - in Metal Core Block PCB) 3. Horn (Low pitch) 4. Horn (High pitch) 5. Clock spring Repair procedures Removal 1. Remove the front bumper assembly. (Refer to Body - "Front Bumper Assembly") 2.Kia Stinger (CK) 2018-2023 Owner's Manual: FCA front radar / camera sensor
In order for the FCA system to operate properly, always make sure the sensor or sensor cover is clean and free of dirt, snow, and debris. Dirt, snow, or foreign substances on the lens may adversely affect the sensing performance of the sensor. ✽ NOTICE Do not install any accessories, such as a license plate bracket or bumper sticker near the sensor area.Categories
- Manuals Home
- Kia Stinger Owners Manual
- Kia Stinger Service Manual
- New on site
- Most important about car
Contents
