Kia Stinger CK: Limitation of the system / Recognizing vehicles
The sensor may be limited when:
- The radar or the camera is contaminated with foreign substances.
- It heavily rains or snows.
- There is electromagnetic interference.
- Something in the path of travel deflects the radar waves.
- The vehicle in front has a narrow body. (i.e. motor cycle and bicycle)
- The driver's view is not clear due to backlight, reflected light, or darkness.
- The camera cannot contain the full image of the vehicle in front.
- The vehicle in front is a special vehicle, such as a heavily-loaded truck or a
trailer.
- The outside brightness is greatly changed, such as entering/exiting a tunnel.
- The vehicle driving is on a rough or bumpy road.
- The radar/camera sensor recognition is limited.
- The vehicle in front is driving erratically
- The vehicle is driven near areas containing metal substances such as a construction
zone, railroad, etc.
- Moisture on the windshield is not completely removed or frozen.
- The weather is misty.
- The vehicle in front does not turn ON the rear lights, does not have rear lights,
has asymmetric rear lights, or has rear lights out of angle.
- The vehicle is on unpaved or uneven rough surfaces, or roads with sudden gradient
changes.
- The vehicle is moving under ground level or inside a building.
- If a sudden change in the sensor recognition takes place while driving over a
speed bump,
- When the vehicle is severely shaken,
- When driving around a circular intersection with a vehicle or object in front.
- If the front of the camera lens is contaminated by front glass tinting, film,
water repellent coating, damage on glass, or foreign matter (sticker, insect, etc.)
- The radar or camera or camera lens is damaged.
- If the headlights of the vehicle are not used at night or in a tunnel section,
or the light is too weak
- If street light or the light of a vehicle coming from the opposite direction is
reflected or when sunlight is reflected by water on the road surface
- When the back light is projected in the direction of the vehicle's motion (including
the headlights of vehicles)
- Road sign, shadow on the road, tunnel entrance, toll gate, partial pavement
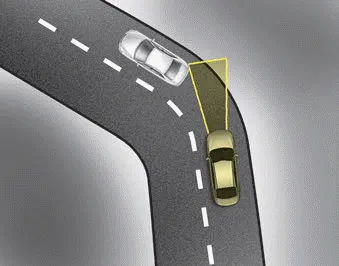
- Driving on a curve
The FCA performance may be limited while driving on a curve. The FCA may not recognize the vehicle in front even if in the same lane. It may produce the warning message and the warning alarm prematurely, or it may not produce the warning message or the warning alarm at all. When driving on a curve, exercise caution, maintain a safe braking distance, and if necessary, depress the brake pedal to reduce your driving speed in order to maintain a safe distance.
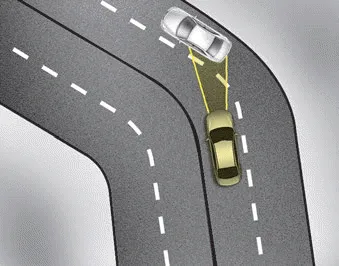
The FCA system may recognize a vehicle in an adjacent lane when driving on a curved road. In this case, the system may apply the brake. Always pay attention to road and driving conditions while driving. If necessary, depress the brake pedal to reduce your driving speed in order to maintain a safe distance. Also, when necessary, you may depress the accelerator pedal to prevent the system from unnecessarily decelerating your vehicle. Always check the traffic conditions around the vehicle.
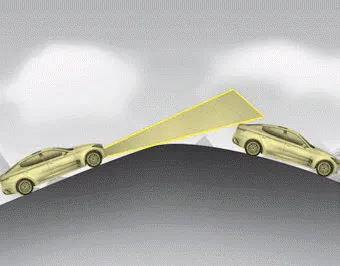
- Driving on a slope
The FCA performance may be limited while driving upward or downward on a slope, and may not recognize a vehicle in front in the same lane. It may produce the warning message and the warning alarm prematurely, or it may not produce the warning message and the warning alarm at all.
When the FCA suddenly recognizes the vehicle in front while passing over a slope, you may experience sharp deceleration.
Always keep your eyes forward while driving upward or downward on a slope, and, if necessary, depress the brake pedal to reduce your driving speed in order to maintain a safe distance.
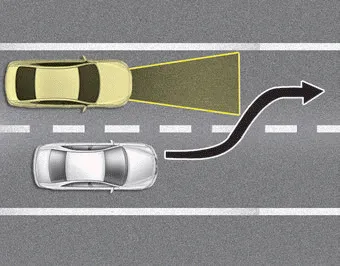
- Changing lanes
When a vehicle changes lanes in front of you, the FCA system may not immediately detect the vehicle, especially if the vehicle changes lanes abruptly. In this case, you must maintain a safe braking distance, and if necessary, depress the brake pedal to reduce your driving speed in order to maintain a safe distance.
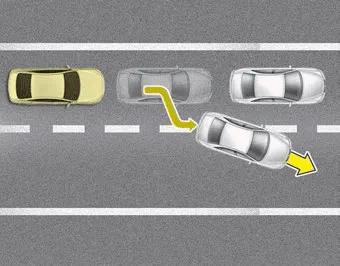
When driving in stop-and-go traffic, and a stopped vehicle in front of you merges out of the lane, the FCA system may not immediately detect the new vehicle that is now in front of you. In this case, you must maintain a safe braking distance, and if necessary, depress the brake pedal to reduce your driving speed in order to maintain a safe distance.
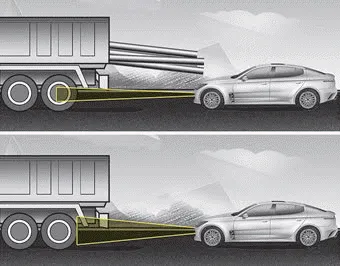
- Recognizing the vehicle
If the vehicle in front of you has cargo that extends rearward from the cab, or when the vehicle in front of you has higher ground clearance, additional special attention is required. The FCA system may not be able to recognize the cargo extending from the vehicle. In these instances, you must maintain a safe braking distance from the rearmost object, and if necessary, depress the brake pedal to reduce your driving speed in order to maintain distance.


Other information:
Kia Stinger (CK) 2018-2023 Owner's Manual: Good braking practices
Check to be sure the parking brake is not engaged and the parking brake indicator light is out before driving away. Driving through water may get the brakes wet. They can also get wet when the vehicle is washed. Wet brakes can be dangerous! Your vehicle will not stop as quickly if the brakes are wet. Wet brakes may cause the vehicle to pull to one side.Opening the hood 1. Pull the release lever to unlatch the hood. The hood should pop open slightly. Only open the hood with the vehicle on a flat surface, engine is turned off, shift lever placed in P (Park) position and setting the parking brake. 2. Go to the front of the vehicle, raise the hood slightly, push the secondary latch (1) left side of the hood center and lift the hood (2).Categories
- Manuals Home
- Kia Stinger Owners Manual
- Kia Stinger Service Manual
- New on site
- Most important about car
