Kia Stinger CK: Hydraulic System / Valve Body
Components and components location
| Components |
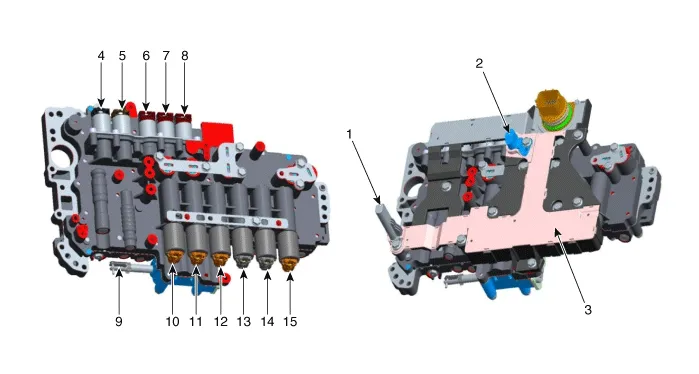
| 1. Input speed sensor 2. Output speed sensor 3. E-Module 4. Line pressure control solenoid valve 5. Damper clutch control solenoid valve 6. P position ON/OFF Solenoid valve 7. D position ON/OFF Solenoid valve 8. R position ON/OFF Solenoid valve |
9. Parking release pistion
10. 8LR/B control solenoid valve 11. 6/C control solenoid valve 12. 27/B control solenoid valve 13. 35R/C control solenoid valve 14. 4&OD/C control solenoid valve 15. UD/C control solenoid valve |
Description and operation
| Description |
The valve body is essential to automatic transmission control and consists of various valves used to control the oil feed from the oil pump.
Repair procedures
| Replacement |
It is not recommended to replace the valve body. If the valve body needs to be replaced, the automatic transmission assembly should be replaced and the oil pressure characteristics should be input using the KDS. If replacing the valve body, it is not possible to input the oil pressure characteristics using the KDS and if not performing the oil pressure characteristics input procedure, a shift shock or delay may occur. |

| 1. |
Replace the automatic transmission assembly. (Refer to Automatic Transmission System - "Automatic Transmission System") |


Other information:
Kia Stinger (CK) 2018-2023 Service Manual: 6 Clutch Control Solenoid Valve (6/C_VFS)
Specifications Specifications Item Specification Control type N/L (Normal Low) Control pressure kpa (kgf/cm², psi) 0 - 1,569.06 (0 - 16, 0 - 227.57) Current (mA) 0 - 1,100 Coil resistance (Ω) 5.Kia Stinger (CK) 2018-2023 Service Manual: SRS Control Module (SRSCM)
Description and operation Description The primary purpose of the SRSCM (Supplemental Restraints System Control Module) is to discriminate between an event that warrants restraint system deployment and an event that does not. The SRSCM must decide whether to deploy the restraint system or not. After determining that pretensioners and/or airbag deployment is required, the SRSCM must supply sufficient power to the pretensioners and airbag igniters to initiate deployment.Categories
- Manuals Home
- Kia Stinger Owners Manual
- Kia Stinger Service Manual
- New on site
- Most important about car
