Kia Stinger CK: Automatic Transmission Control System / Transmission Oil Temperature Sensor
Specifications
| Specifications |
|
Item |
Specification |
|
|
Oil temperature sensor |
Type |
*NTC thermistor |
|
Temp.[(°C)°F] / Resistance (kΩ) |
(-40)-40 / 139.5 |
|
|
(-20)-4 / 47.4 |
||
|
(0)32 / 18.6 |
||
|
(20)68 / 8.1 |
||
|
(40)104 / 3.8 |
||
|
(60)140 / 1.98 |
||
|
(80)176 / 1.08 |
||
|
(100)212 / 0.63 |
||
|
(120)248 / 0.38 |
||
|
(140)284 / 0.25 |
||
|
(150)302 / 0.16 |
||
*NTC: Negative Temperature Coefficient
Components and components location
| Components |
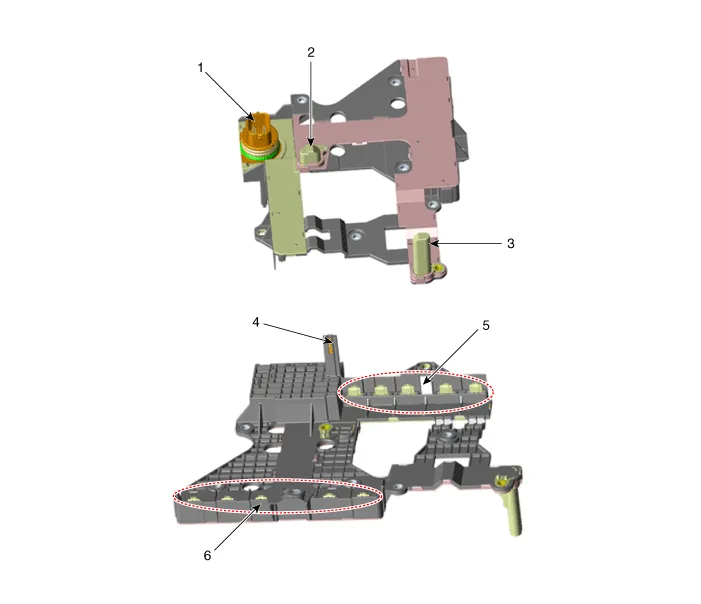
| 1. E module connector 2. Output speed sensor 3. Input speed sensor |
4. Oil temperature sensor 5. Indirect control solenoid valve connector 6. Direct control solenoid valve connector |
Description and operation
| Description |
| • |
The sensor used is a thermistor (NTC) in which resistance changes with temperature variation. |
| • |
When the TCM supplies power to sensor, the sensor output value changes depending on ATF temperature. |
| • |
Oil temperature sensor is integrated with E module. |
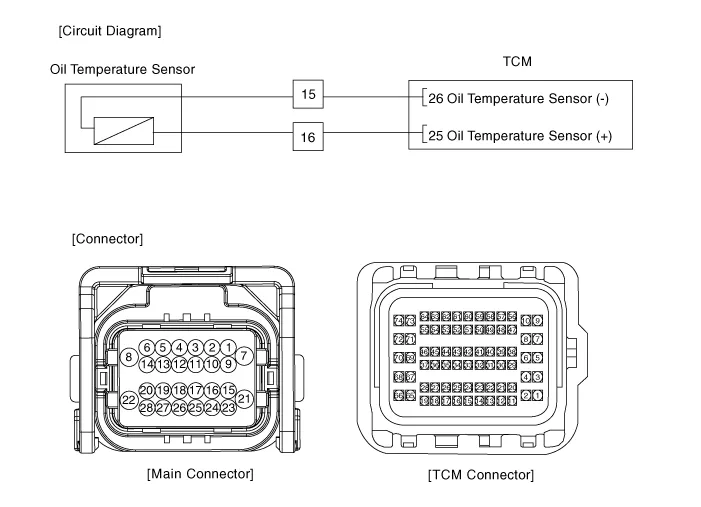
Schematic diagrams
| Circuit Diagram |
Repair procedures
| Inspection |
| 1. |
Switch "OFF" ignition. |
| 2. |
Disconnect the main connector (A).
|

| 3. |
Measure the resistance between + terminal (15) and - terminal (16). |
| 4. |
Check that the resistance is within the specification.
|
||||||||||||||||||
| Replacement |
The oil temperature sensor is integrated into the E-module that can’t be disassembled. So refer to “E-module” for the removal or installation procedure of the oil temperature sensor. |

| 1. |
Replace the E-module. (Refer to Automatic Transmission Control System - "E-Module") |


Other information:
Kia Stinger (CK) 2018-2023 Service Manual: Specifications
Service data Specification Item Resistance (Ω) Driver Airbag (DAB) 1.7 - 2.3 Passenger Airbag (PAB) 1.7 - 2.3 Side Airbag (SAB) 1.8 - 2.4 Curtain Airbag (CAB) 1.7 - 2.3 Seat Belt Pretensioner (BPT) 1.Kia Stinger (CK) 2018-2023 Service Manual: Emergency Signal System
Description and operation Description Introduction of quick brake warning system (ESS) In case of quick brake by driver, the brake lamp or turn signal is blinked to warn against the vehicle at rear. 1. Basic function (Blinking the brake lamp/emergency lamp) – Operation condition: In case of quick brake or operation of ABS above in a certain speed – Releasing condition: In case of stopping the quick brake or releasing the ABS operation 2.Categories
- Manuals Home
- Kia Stinger Owners Manual
- Kia Stinger Service Manual
- New on site
- Most important about car
