Kia Stinger CK: All Wheel Drive (AWD) / Emergency precautions
Contents:
Tires
WARNING
Do not use tires and wheels of a different size and type than the ones originally installed on your vehicle. It can affect the safety and performance of your vehicle, which could lead to increased steering difficulty or rollover causing serious injury.
When replacing the tires, be sure to equip all four tires with the tire and wheel of the same size, type, tread, brand and load-carrying capacity.
In case of emergency such as tire puncture, repair it using TMK (Tire Mobility Kit) for temporary use. Afterwards, have the tire be inspected by an authorized Kia dealer.
WARNING

Never start or run the engine while an AWD vehicle is raised on a jack.The vehicle can slip or roll off of a jack causing serious injury or death to you or those nearby.
Towing
AWD vehicles must be towed with a wheel lift and dollies or flatbed equipment with all the wheels off the ground. For more information, refer to "Towing" in chapter 6.
Vehicle inspection
- When the vehicle is on a car lift, do not operate the front and rear wheels separately. All four wheels should be operated.
- Never engage the parking brake while running the engine on a car lift. This may damage the AWD system.
Dynamometer testing
An AWD vehicle must be tested on a special four wheel chassis dynamometer.
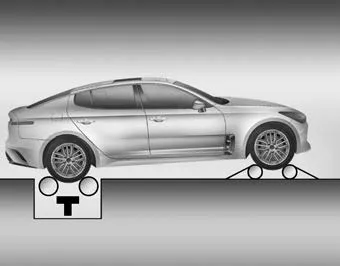
An AWD vehicle should not be tested on a 2WD roll tester. If a 2WD roll tester must be used, perform the following procedure:
1. Check the tire pressures recommended for your vehicle.
2. Place the rear wheels on the roll tester for a speedometer test as shown in the illustration.
3. Release the parking brake.
4. Place the front wheels on the temporary free roller as shown in the illustration.
WARNING
Keep away from the front of the vehicle while the vehicle is in gear on the dynamometer. The vehicle can jump forward and cause serious injury or death.


Other information:
Kia Stinger (CK) 2018-2023 Owner's Manual: Console Temperature Control Actuator
Repair procedures Inspection 1. Turn the ignition switch OFF. 2. Disconnect the mode control actuator connector. 3. Verify that the mode control actuator operates to the defrost mode when 12V is connected to terminal 3 and ground to terminal 7. Verify that the mode control actuator operates to the vent mode when connected in reverse.Kia Stinger (CK) 2018-2023 Owner's Manual: Rear Seat Belt Retractor
Components and components location Component Location 1. Rear seat belt retractor [LH] 2. Rear seat belt retractor [RH] Repair procedures Replacement When installing the belt, be careful not to damage the retractor.Categories
- Manuals Home
- Kia Stinger Owners Manual
- Kia Stinger Service Manual
- New on site
- Most important about car
Contents
