Kia Stinger CK: Airbag Module / Knee Airbag (KAB) Module
Description and operation
| Description |
Installed inside the crash pad, the knee airbag (KAB) protects the driver in the event of a frontal crash. The SRSCM determines if and when to deploy the KAB.
Never attempt to measure the circuit resistance of the airbag module (squib) even if you are using a specified tester. If the circuit resistance is measured with a tester, accidental airbag deployment will result in serious personal injury. |

Components and components location
| Components |

| 1. Knee Airbag (KAB) |
Repair procedures
| Removal |
| 1. |
Disconnect the negative battery terminal, and wait for at least three minutes before beginning to work. |
| 2. |
Remove the crash pad lower panel. (Refer to Body (Interior and Exterior) - "Crash Pad Lower Panel") |
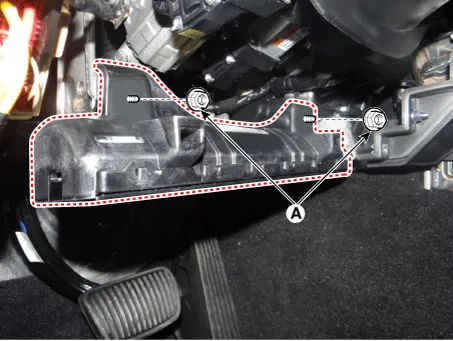
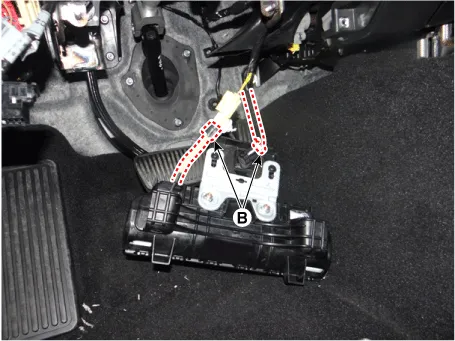
| 3. |
Loosen the nuts (A) and then disconnect the connector (B).
|
| Installation |
| 1. |
Disconnect the negative battery terminal, and wait for at least three minutes before beginning to work. |
| 2. |
Install in the reverse order of removal. |
| 3. |
Reconnect the negative battery cable. |
| 4. |
After installing the knee airbag (KAB), confirm proper system operation. • Switch "ON" the ignition. The SRS indicator light should turn on for about six seconds and then off. |


Other information:
Repair procedures Replacement • When removing and installing the hood lifter, work in a group of two or more. • When removing the hood lifter, first remove the lower portion and then upper portion.General market Normal Maintenance Schedule - Except Europe (Including Russia) The following maintenance services must be performed to ensure good emission control and performance. Keep receipts for all vehicle emission services to protect your warranty. Where both mileage and time are shown, the frequency of service is determined by whichever occurs first.Categories
- Manuals Home
- Kia Stinger Owners Manual
- Kia Stinger Service Manual
- New on site
- Most important about car
