Kia Stinger CK: Lighting / Lighting control
Contents:
The light switch has a Headlight and a Parking light position.
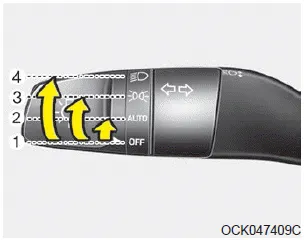
To operate the lights, turn the knob at the end of the control lever to one of the following positions:
(1) OFF position
(2) Auto light position
(3) Parking & Tail light
(4) Headlight position
Parking & Tail light

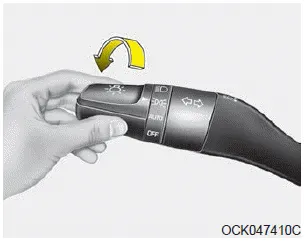
When the light switch is in the parking light position, the tail, license and parking lights will turn ON.
Headlight position

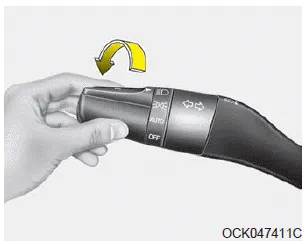
When the light switch is in the headlight position, the head, tail, license lights will turn ON.
✽ NOTICE
The ignition switch must be in the ON position to turn on the headlights.
Auto light/DBL position
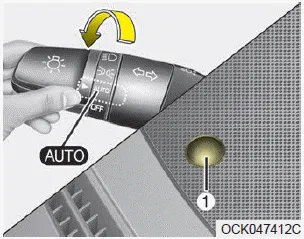
When the light switch is in the AUTO light position, the taillights and headlights will turn ON or OFF automatically depending on the amount of light outside the vehicle.
If your vehicle is equipped with the dynamic bending light (DBL), it will also operate when the headlamp is ON.
CAUTION
- Never place anything over the sensor (1) located on the instrument panel, this will ensure better auto-light system control.
- Don’t clean the sensor using a window cleaner, the cleaner may leave a light film which could interfere with sensor operation.
- If your vehicle has window tint or other types of metallic coating on the front windshield, the Auto light system may not work properly.


Other information:
Kia Stinger (CK) 2018-2023 Owner's Manual: Transmission Oil Temperature Sensor
Specifications Specifications Item Specification Oil temperature sensor Type *NTC thermistor Temp.[(°C)°F] / Resistance (kΩ) (-40)-40 / 139.5 (-20)-4 / 47.4 (0)32 / 18.6 (20)68 / 8.1 (40)104 / 3.Kia Stinger (CK) 2018-2023 Owner's Manual: AVN Remote Controller
Components and components location Components 1. Left Remote Control Switch (Audio + Bluetooth + Voice) 2. Right Remote Control Switch (Trip Computer + ACC + SCC) Schematic diagrams Circuit Diagram [Audio + Bluetooth + Voice] [Trip + ACC] [Trip + ACC + SCC] Repair procedures Removal 1.Categories
- Manuals Home
- Kia Stinger Owners Manual
- Kia Stinger Service Manual
- New on site
- Most important about car
Contents
