Kia Stinger CK: Automatic Transmission Control System / Transmission Oil Temperature Sensor
Specifications
| Specifications |
|
Item |
Specification |
|
|
Oil temperature sensor |
Type |
*NTC thermistor |
|
Temp.[(°C)°F] / Resistance (kΩ) |
(-40)-40 / 139.5 |
|
|
(-20)-4 / 47.4 |
||
|
(0)32 / 18.6 |
||
|
(20)68 / 8.1 |
||
|
(40)104 / 3.8 |
||
|
(60)140 / 1.98 |
||
|
(80)176 / 1.08 |
||
|
(100)212 / 0.63 |
||
|
(120)248 / 0.38 |
||
|
(140)284 / 0.25 |
||
|
(150)302 / 0.16 |
||
*NTC: Negative Temperature Coefficient
Components and components location
| Components |
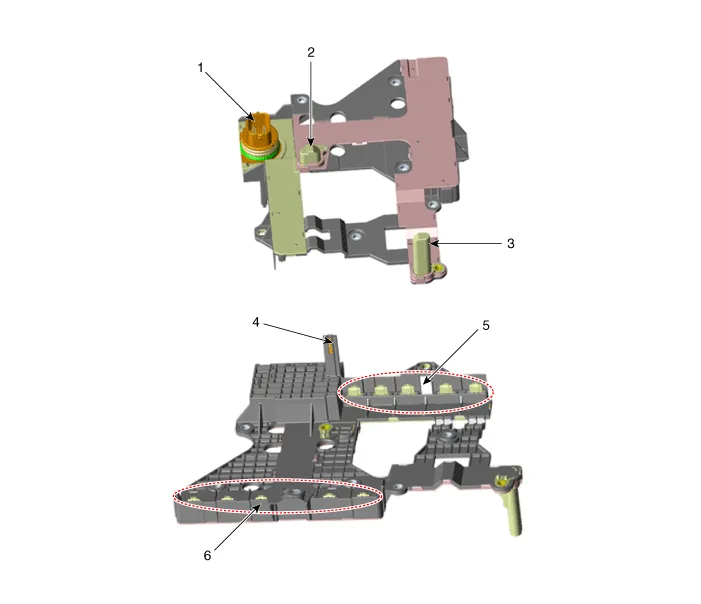
| 1. E module connector 2. Output speed sensor 3. Input speed sensor |
4. Oil temperature sensor 5. Indirect control solenoid valve connector 6. Direct control solenoid valve connector |
Description and operation
| Description |
| • |
The sensor used is a thermistor (NTC) in which resistance changes with temperature variation. |
| • |
When the TCM supplies power to sensor, the sensor output value changes depending on ATF temperature. |
| • |
Oil temperature sensor is integrated with E module. |
Schematic diagrams
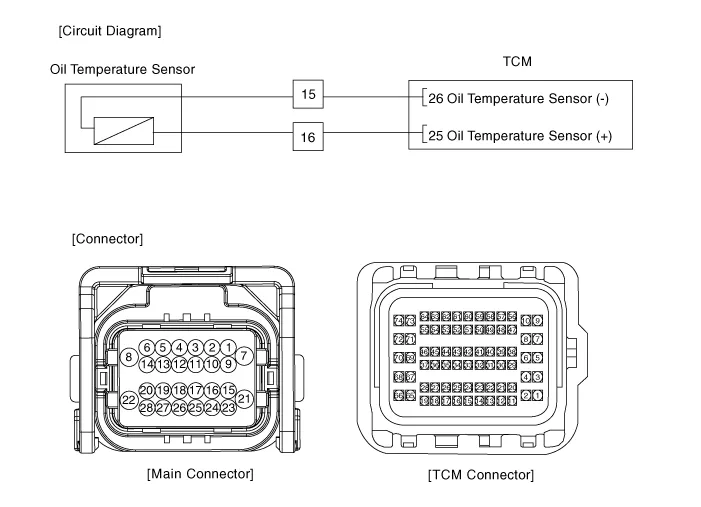
| Circuit Diagram |
Repair procedures
| Inspection |
| 1. |
Switch "OFF" ignition. |
| 2. |
Disconnect the main connector (A).
|

| 3. |
Measure the resistance between + terminal (15) and - terminal (16). |
| 4. |
Check that the resistance is within the specification.
|
||||||||||||||||||
| Replacement |
The oil temperature sensor is integrated into the E-module that can’t be disassembled. So refer to “E-module” for the removal or installation procedure of the oil temperature sensor. |

| 1. |
Replace the E-module. (Refer to Automatic Transmission Control System - "E-Module") |


Other information:
Kia Stinger (CK) 2018-2023 Service Manual: Engine Control / Fuel System
Special service tools Special Service Tools Tool Name / Number Illustration Description Fuel Pressure Gauge 09353-24100 Used for measuring the pressure in fuel line Fuel Pressure Gauge Adaptor 0K353-D4100 Used for connecting between high pressure fuel pump and low pressure fuel feed tube to measure the pressure in fuel line ※SST 09353-02100 also can be used Heated Oxygen Sensor Socket Wrench 09392-1Y100 Removal and installation of the heated oxygen sensor ※ SST No.Kia Stinger (CK) 2018-2023 Service Manual: Turbocharger & Exhaust Manifold
Components and components location Components 1. Turbo manifold module 2. Turbo manifold module gasket 3. Heat protector 4. Warm-up catalytic converter (WCC) heat protector 5. Oil feed pipe 6. Turbo manifold module stay 7. Oil drain pipe 8. Turbocharger oil drain pipe gasket A 9.Categories
- Manuals Home
- Kia Stinger Owners Manual
- Kia Stinger Service Manual
- New on site
- Most important about car
