Kia Stinger CK: Engine And Transmission Assembly / Engine Mounting
Components and components location
| Components |

| 1. Engine mounting support bracket
(LH) 2. Engine mounting support bracket (RH) 3. Engine mounting bracket (LH) |
4. Engine mounting bracket (RH)
5. Transmission mounting bracket (AWD) 6. Transmission mounting bracket (2WD) |
Repair procedures
| Removal and Installation |
Engine Mounting Bracket
| 1. |
Remove the engine room front under cover and engine room side cover. (Refer to Engine and Transmission Assembly - "Engine Room Under Cover") |
| 2. |
Disconnect the universal joint assembly from the shaft joint. (Refer to Steering System - "Steering Column and Shaft") |
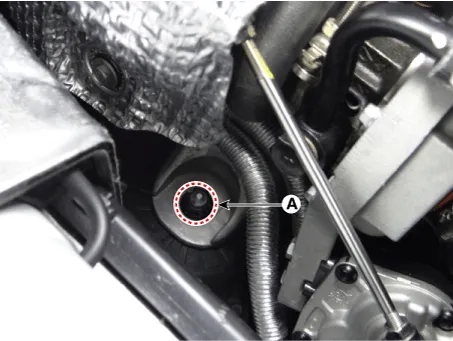
| 3. |
Remove the engine mounting support bracket nut (A).
[LH]
[RH]
|

| 4. |
Install the jack to the edge of the oil pan to support the engine.
|


| 5. |
Lift the engine slightly using the jack to obtain space for removing the engine mounting. |
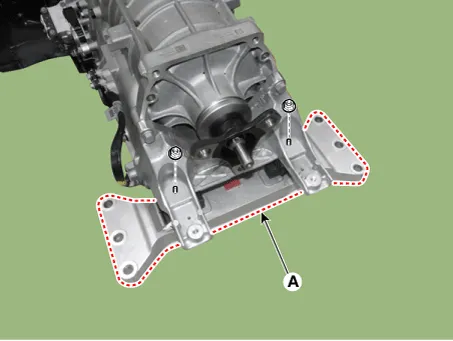
| 6. |
Remove the engine mounting bracket (A).
[LH]
[RH]
|


| 7. |
Install in the reverse order of removal. |
Transmission mounting bracket (AWD)
| 1. |
Remove the engine room rear under cover. (Refer to Engine and Transmission Assembly - "Engine Room Under Cover") |
| 2. |
Install the jack under the transmission to support the transmission.
|

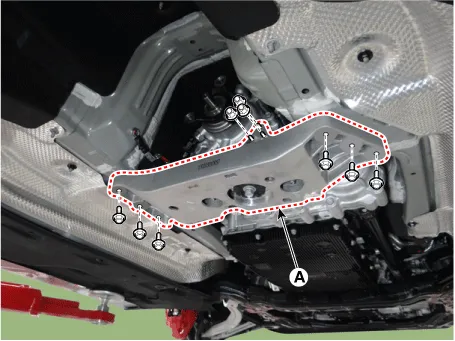
| 3. |
Remove the transmission mounting bracket (A).
|
| 4. |
Install in the reverse order of removal. |
Transmission mounting bracket (2WD)
| 1. |
Remove the engine room rear under cover. (Refer to Engine and Transmission Assembly - "Engine Room Under Cover") |
| 2. |
Install the jack under the transmission to support the transmission.
|
| 3. |
Remove the transmission mounting bracket mounting bolts (A).
|
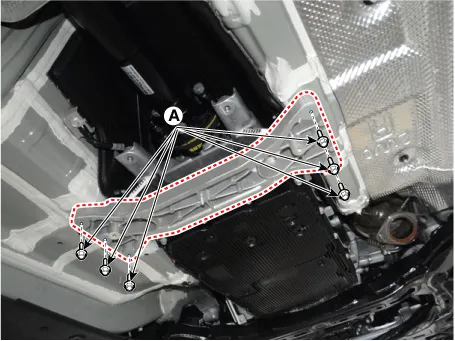
| 4. |
Remove the transmission mounting bracket (A).
|
| 5. |
Install in the reverse order of removal. |


Other information:
Kia Stinger (CK) 2018-2023 Service Manual: Driver's and passenger's front air bag
■ Driver’s front air bag ■ Driver’s knee air bag ■ Passenger’s front air bag Your vehicle is equipped with an Advanced Supplemental Restraint (Air Bag) System and lap/shoulder belts at both the driver and passenger seating position. The indication of the system's presence are the letters “AIR BAG” located on the air bag pad cover on the steering wheel and the passenger's side front panel pad above the glove box.Kia Stinger (CK) 2018-2023 Service Manual: To keep locks from freezing
To keep the locks from freezing, squirt an approved de-icer fluid or glycerine into the key opening. If a lock is covered with ice, squirt it with an approved de-icing fluid to remove the ice. If the lock is frozen internally, you may be able to thaw it out by using a heated key. Handle the heated key with care to avoid injury. Use approved window washer anti-freeze in system To keep the water in the window washer system from freezing, add an approved window washer anti-freeze solution in accordance with instructions on the container.Categories
- Manuals Home
- Kia Stinger Owners Manual
- Kia Stinger Service Manual
- New on site
- Most important about car
