Kia Stinger CK: Drive Belt System / Drive Belt Tensioner
Kia Stinger (CK) 2018-2023 Service Manual / Engine Mechanical System / Drive Belt System / Drive Belt Tensioner
Repair procedures
| Removal and Installation |
| 1. |
Remove the drive belt. (Refer to Drive Belt System - "Drive Belt") |
| 2. |
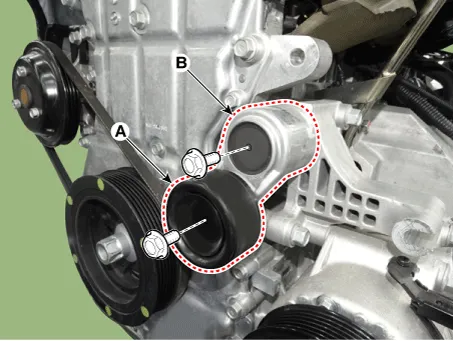
Remove the drive belt auto tensioner pulley (A).
|

| 3. |
Remove the drive belt tensioner (B).
|
| 4. |
Install in the reverse order of removal. |


Other information:
Components and components location Component [THETA Engine] 1. Clutch Bolt 2. Limiter Bolt 3. Limiter & Hub Assembly 4. Snap Ring 5. Pulley 6. Compressor Assembly [LAMBDA Engine] 1. Clutch Bolt 2. Limiter Bolt 3. Limiter & Hub Assembly 4.Repair procedures Inspection 1. Connect the battery voltage and check for blower motor operation. 2. If the blower motor does not operate well, substitute with a known-good blower motor and check for proper operation. 3. Replace the blower motor if it is proved that there is a problem with it.Categories
- Manuals Home
- Kia Stinger Owners Manual
- Kia Stinger Service Manual
- New on site
- Most important about car

Copyright © 2026 www.kstinger.com 0.0099