Kia Stinger CK: Wide Sunroof / Wide Sunroof Motor
Repair procedures
| Replacement |
| 1. |
Disconnect the negative (-) battery terminal. |
| 2. |
Remove the roof trim assembly. (Refer to Body - "Roof Trim Assembly") |
| 3. |
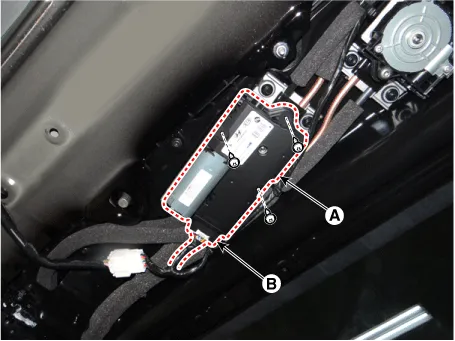
Remove the glass motor (A) after loosening the screws and disconnecting the connector. [Glass Motor]
|
| 4. |
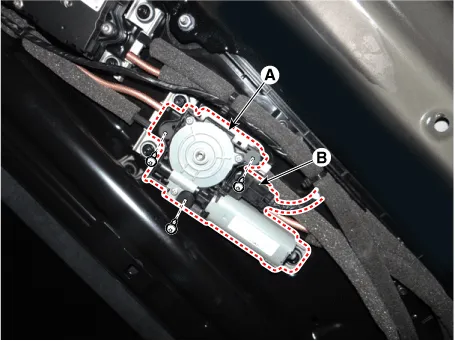
Remove the roller blind motor (A) after loosening the screws and disconnecting the connector. [Roller Blind Motor]
|
| Adjustment |
| 1. |
Turn the ignition switch to the ON position or start the engine.
|

| 2. |
Close the sunroof glass and roller blind completely if opend. |
| 3. |
Release the sunroof switch. |
| 4. |
Push the sunroof switch forward in the direction of close (about 10 seconds) until the sunroof glass and roller blind slightly move. (You can hear 2 times of clack sound in this time.) Then release the sunroof switch. |
| 5. |
Within 5 seconds after release the sunroof switch, push the sunroof switch forward in the direction of close, until the sunroof operates as follow again : Roller blind open → Glass open → Glass close → Roller blind close
|
| 6. |
Release the sunroof switch after all operation has completed. (The sunroof system has been reset.) |
| 7. |
Check if the Sunroof operated with one touch. |
| Inspection |
[Glass motor / Blind motor Inspection]
| 1. |
Disconnect the negative (-) battery terminal. |
| 2. |
Remove the roof trim assembly. (Refer to Body - "Roof Trim Assembly") |
| 3. |
Disconnect the wide sunroof wiring connector .
|

| 4. |
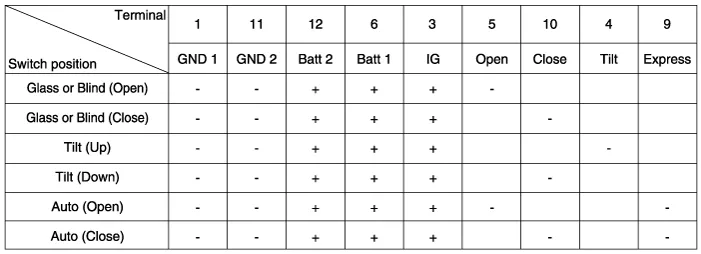
Ground the terminals as below table, and check that the panorama sunroof unit operates.
|


Other information:
Kia Stinger (CK) 2018-2023 Service Manual: Around View Monitor (AVM) Switch
Repair procedures Removal Put on gloves to protect your hands. • When prying with a flat-tip screwdriver or use a prying trim tool, wrap it with protective tape, and apply protective tape around the related parts, to prevent damage.Components and components location Component Location 1. Sunvisor 2. Repair procedures Replacement Put on gloves to protect your hands. • Use a plastic panel removal tool to remove interior trim pieces without marring the surface.Categories
- Manuals Home
- Kia Stinger Owners Manual
- Kia Stinger Service Manual
- New on site
- Most important about car
