
Kia Stinger CK: Engine Mechanical System / Cylinder Block
Kia Stinger (CK) 2018-2023 Service Manual / Engine Mechanical System / Cylinder Block
Contents:
Components and components location
| Components |
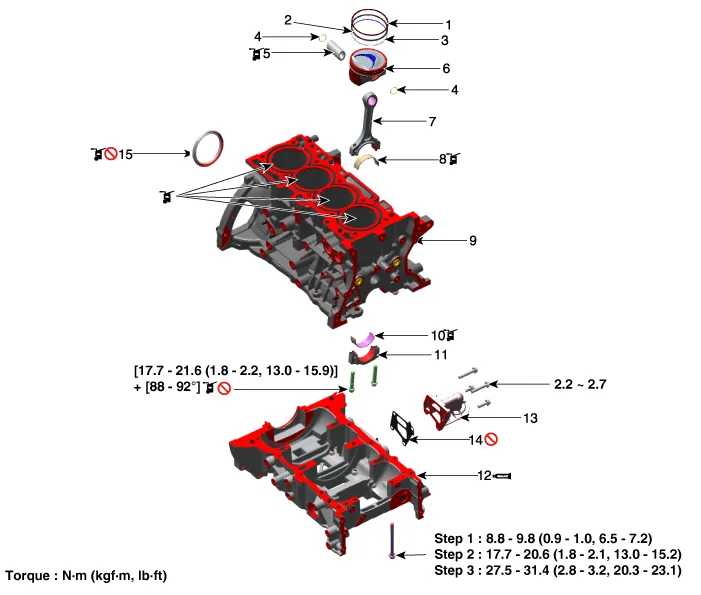
| 1. Piston ring (#1) 2. Piston ring (#2) 3. Oil ring 4. Snap ring 5. Piston pin 6. Piston 7. Connecting rod |
8. Connecting rod upper bearing
9. Cylinder block 10. Connecting rod lower bearing 11. Connecting rod bearing cap 12. Ladder frame 13. Oil filter bracket 14. Oil filter bracket gasket 15. Rear oil seal |
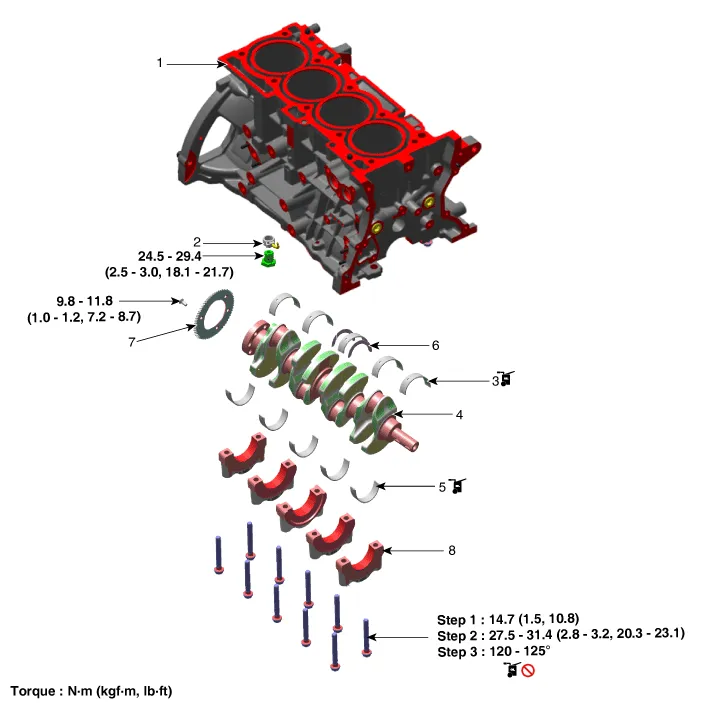
| 1. Cylinder block 2. Piston cooling oil jet 3. Crankshaft upper bearing 4. Crankshaft |
5. Crankshaft lower bearing
6. Thrust bearing 7. Crankshaft position sensor (CKPS) wheel 8. Main bearing cap |
Water Jacket Separator
Repair procedures
| Removal and Installation |
| 1. |
Remove the cylinder head. (Refer to Cylinder Head Assembly - "Cylinder Head") |
| 2. |
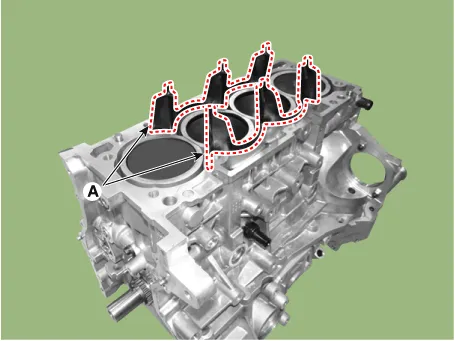
Remove the water jacket separator (A).
|
| 3. |
Install the other parts in the reverse order of removal. |
Drive Plate ➤
Rear Oil Seal ➤
Piston and Connecting Rod ➤
Crankshaft ➤
Cylinder Block ➤


Other information:
Kia Stinger (CK) 2018-2023 Service Manual: Tilt and telescopic steering
Tilt and telescopic steering allows you to adjust the steering wheel before you drive.You can also raise it to give your legs more room when you exit and enter the vehicle. The steering wheel should be positioned so that it is comfortable for you to drive, while permitting you to see the instrument panel warning lights and gauges. WARNING - Steering wheel adjustment Never adjust the angle and height of the steering wheel while driving.Kia Stinger (CK) 2018-2023 Service Manual: Power Seat Control Switch
Repair procedures Inspection Diagnosis With KDS 1. The body electrical system can be quickly diagnosed for failed parts by using the vehicle diagnostic system (KDS). The diagnostic system (KDS) provides the following information. (1) Self diagnosis : Checks and displays the failure code (DTC).Categories
- Manuals Home
- Kia Stinger Owners Manual
- Kia Stinger Service Manual
- New on site
- Most important about car
Contents

Copyright © 2026 www.kstinger.com 0.0118