Kia Stinger CK: Blind-spot Collision Warning (BCW) / RCCW (Rear Cross-Traffic Collision Warning)
Contents:
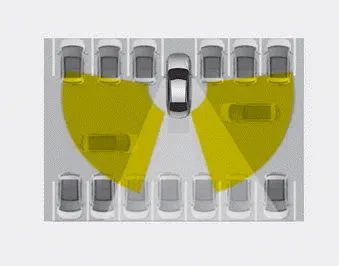
When your vehicle moves backwards from a parking position, the sensor detects approaching vehicles to the left or right side direction and gives information to the driver.
Operating conditions
- Select RCCW (Rear Cross-Traffic Collision Warning) in “User Settings” under “Driver Assistance” on the instrument cluster. The system will turn on and standby to activate.
- Select RCCW again, to turn the system off. • If the vehicle is turned off, the RCCW system will remember the last settings upon restart.
- The system operates when the vehicle speed is below 10km/h (6 mph) with the shift lever in R (Reverse).
- The RCCW (Rear Cross-Traffic Collision Warning) detecting range is 0.5 m ~ 20 m (1.6 feet ~ 65 feet) based on the side direction. If the approaching vehicle speed is 4 km/h (2.5 mph) ~ 36 km/h (22 mph) within sensing range, it is detected. However, the system sensing range can vary based on conditions. Always pay attention to your surroundings.
Warning type ➤
Warning message

The message will appear to notify the driver if there are foreign substances on the surface or inside the rear bumper or it is hot near the rear bumper. The light on the switch and the system will be turned off automatically.
Remove the foreign substance on the rear bumper.
After the foreign substance is removed, if you drive for approximately 10 minutes, the system will work normally.
If the system does not work normally even though the foreign substance, trailer or carrier, or other equipment is removed, have the system checked by an authorized Kia dealer.
It is possible to get the message with no foreign substance on the rear bumper, for example, when driving in a rural or open area, such as desert, where there is insufficient data for operation.
This message may also activate during heavy rain or due to road spray. In this case, the vehicle does not need service.
When the cargo area or other equipment is being used, turn all functions of the system [OFF].
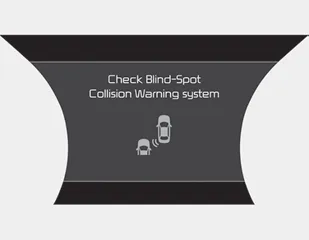
If the system does not work properly, a warning message will appear and the light on the switch will turn off.The system will turn off automatically.
In this case, have the system checked by an authorized Kia dealer.
Non-operating condition
Outside rearview mirror may not alert the driver when:
- The outside rearview mirror housing is damaged or covered with debris.
- The window is covered with debris.
- The windows are severely tinted.


Other information:
Kia Stinger (CK) 2018-2023 Owner's Manual: Coolant
Repair procedures Refilling And Bleeding Never remove the radiator cap when the engine is hot. Serious scalding could be caused by hot fluid under high pressure escaping from the radiator. When pouring engine coolant, be sure to shut the relay box lid and not to let coolant spill on the electrical parts or the paint.Kia Stinger (CK) 2018-2023 Owner's Manual: Piston and Connecting Rod
Repair procedures Disassembly In case of removing the high pressure fuel pump, high pressure fuel pipe, delivery pipe, and injector, there may be injury caused by leakage of the high pressure fuel. So don’t do any repair work right after engine stops. • Use fender covers to avoid damaging painted surfaces.Categories
- Manuals Home
- Kia Stinger Owners Manual
- Kia Stinger Service Manual
- New on site
- Most important about car
Contents
