Kia Stinger CK: Features of your vehicle / Steering wheel
Contents:
Electric power steering (EPS) ➤
Tilt and telescopic steering ➤
Heated steering wheel
With the Engine Start/Stop Button in the ON position, pressing the heated steering wheel button warms the steering wheel. The indicator on the button will illuminate.
To turn the heated steering wheel off, press the button once again. The indicator on the button will turn off.
WARNING
If the steering wheel becomes too warm, turn the system off. The heated steering wheel may cause burns even at low temperatures, especially if used for long periods of time.
✽ NOTICE
The heated steering wheel will turn off automatically approximately 30 minutes after the heated steering wheel is turned on.
CAUTION
- Do not install any type of grip cover for the steering wheel, it may impair the function of the heated steering wheel system.
- When cleaning the heated steering wheel, do not use an organic solvent such as paint thinner, benzene, alcohol and gasoline. Doing so may damage the surface of the steering wheel.
- If the surface of the steering wheel is damaged by a sharp object, damage to the heated steering wheel components could occur.
Horn
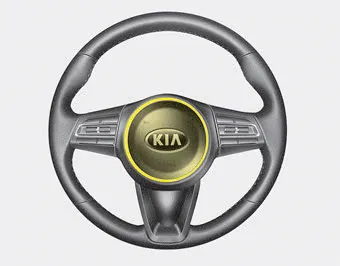
To sound the horn, press the horn symbols on your steering wheel. Check the horn regularly to be sure it operates properly.
✽ NOTICE
To sound the horn, press the area indicated by the horn symbol on your steering wheel (see illustration). The horn will operate only when this area is pressed.


Other information:
Kia Stinger (CK) 2018-2023 Owner's Manual: Crash Pad Lower Panel
Components and components location Component Location 1. Crash pad lower panel Repair procedures Replacement Put on gloves to protect your hands. • Use a plastic panel removal tool to remove interior trim pieces without marring the surface.Kia Stinger (CK) 2018-2023 Owner's Manual: Low tire pressure telltale
When the tire pressure monitoring system warning indicators are illuminated, one or more of your tires is significantly under-inflated. If the telltale illuminates, immediately reduce your speed, avoid hard cornering and anticipate increased stopping distances. You should stop and check your tires as soon as possible. Inflate the tires to the proper pressure as indicated on the vehicle’s placard or tire inflation pressure label located on the driver’s side center pillar outer panel.Categories
- Manuals Home
- Kia Stinger Owners Manual
- Kia Stinger Service Manual
- New on site
- Most important about car
Contents
