Kia Stinger CK: Engine Control System / Intake Air Temperature Sensor (IATS)
Specifications
Temperature
|
Resistance (kΩ)
|
°C
|
°F
|
-40
|
-40
|
40.93 - 48.35
|
-20
|
-4
|
13.89 - 16.03
|
0
|
32
|
5.38 - 6.09
|
10
|
50
|
3.48 - 3.90
|
20
|
68
|
2.31 - 2.57
|
40
|
104
|
1.08 - 1.21
|
50
|
122
|
1.56 - 1.74
|
60
|
140
|
0.54 - 0.62
|
80
|
176
|
0.29 - 0.34
|
Description and operation
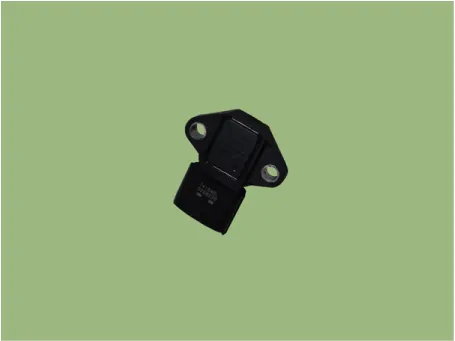
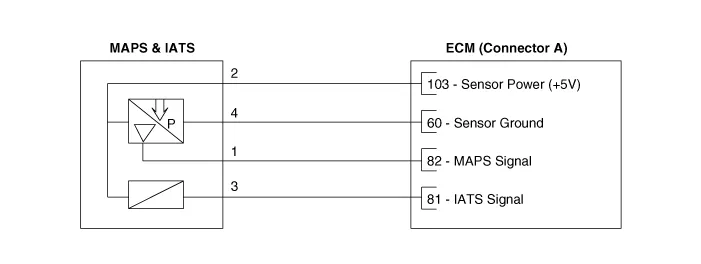
Mounted inside the Manifold Absolute Pressure Sensor, Intake Air Temperature
Sensor (IATS) detects the intake air temperature.
To precisely calculate the amount of air, correction of the air temperature is
required as the air density varies with the temperature. So the ECM uses not only
MAPS signal but also IATS signal. This sensor has a Negative Temperature Coefficient
(NTC) thermistor with resistance in reverse proportion to the temperature.
Schematic diagrams
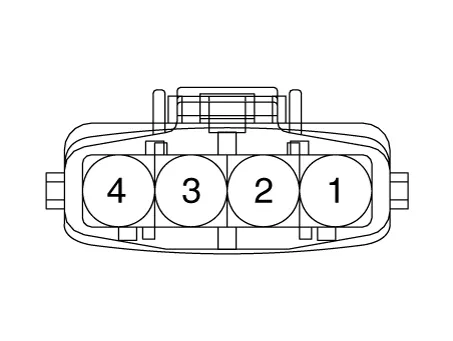
Harness Connector
Repair procedures
| 1. |
Switch "OFF" the ignition.
|
| 2. |
Disconnect the IATS connector.
|
| 3. |
Measure resistance between the IATS terminals 3 and 4.
|
| 4. |
Check that the resistance is within the specification.
Temperature
|
Resistance (kΩ)
|
°C
|
°F
|
-40
|
-40
|
40.93 - 48.35
|
-20
|
-4
|
13.89 - 16.03
|
0
|
32
|
5.38 - 6.09
|
10
|
50
|
3.48 - 3.90
|
20
|
68
|
2.31 - 2.57
|
40
|
104
|
1.08 - 1.21
|
50
|
122
|
1.56 - 1.74
|
60
|
140
|
0.54 - 0.62
|
80
|
176
|
0.29 - 0.34
|
|
| 1. |
Switch "OFF" the ignition and disconnect the negative (-) battery terminal.
|
| 2. |
Remove the engine cover.
(Refer to Engine Mechanical System - "Engine Cover")
|
| 3. |
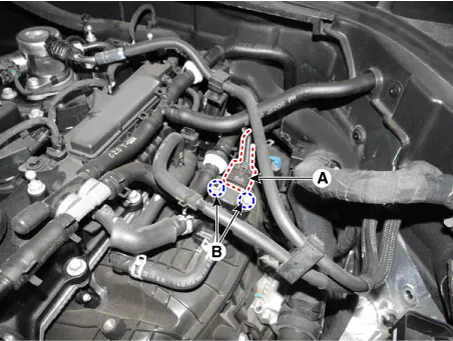
Disconnect the intake air temperature sensor connector (A).
|
| 4. |
Remove the installation bolts (B), and then remove the sensor from the
intake manifold.
|
Intake Air Temperature Sensor installation bolt :
9.8 - 11.8 N·m (1.0 - 1.2 kgf·m, 7.2 - 8.7 lb·ft)
|
|
| • |
Install the component to the specified torques.
|
| • |
Note that internal damage may occur when the component is dropped.
If the component has been dropped, inspect before installing.
|
| • |
Insert the sensor in the installation hole and be careful not
to damage it.
|
|
| 1. |
Install in the reverse order of removal.
|
Other information:
Kia Stinger (CK) 2018-2023 Service Manual: 4 Wheel Drive (AWD) System
Special service tools
Special Service Tools
Tool Name / Number
Illustration
Description
Oil seal installer (Main Shaft)
0K473-J5100
Installation of transfer case oil seal (Main Shaft).
Used with the handle (09231-H1100)
Oil seal installer (Rear Flange)
0K473-J5200
Installation of transfer case oil seal (Rear Flange).
Kia Stinger (CK) 2018-2023 Service Manual: A/C Pressure Transducer
Description and operation
Description
A/C pressure transducer measures the pressure in high pressure line and converts
it into voltage. Based on the converted voltage, engine ECU controls cooling fan
by operating it at high or low speed. Engine ECU stops the operation of compressor
when the temperature of refrigerant line is too high or low irregularly to optimize
air conditioning system.



