Kia Stinger CK: Starting System / Starter Relay
Kia Stinger (CK) 2018-2023 Service Manual / Engine Electrical System / Starting System / Starter Relay
Repair procedures
| Inspection |
| 1. |
Turn ignition switch OFF and disconnect the battery negative (-) terminal. |
| 2. |
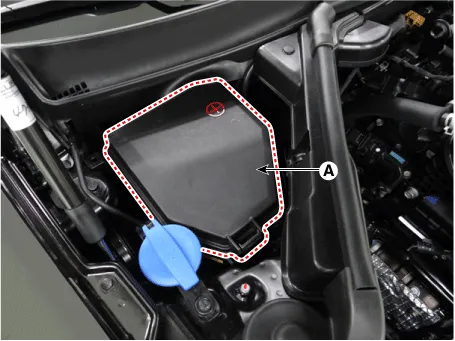
Remove the fuse box cover (A).
|
| 3. |
Remove the starter relay (A).
|

| 4. |
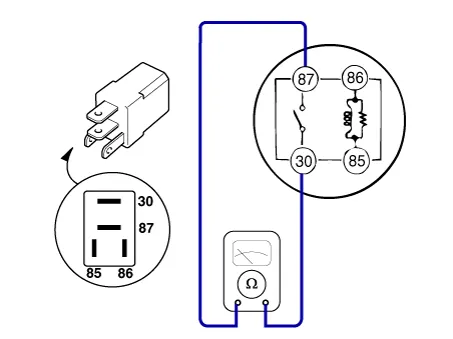
Check for continuity between the terminals (30 and 87) using an ohmmeter.
|
||||||||||
| 5. |
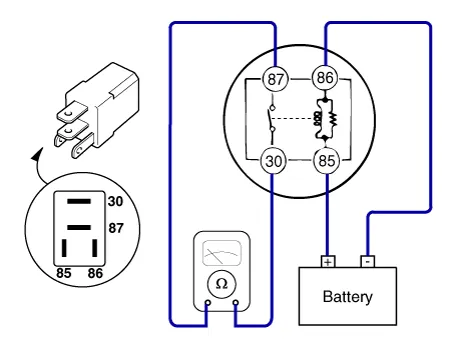
Apply 12V to the terminal 85 and ground to the terminal 86 and then check for continuity between the terminals (30 and 87).
|
||||||||||
| 6. |
Install the starter relay. |
| 7. |
Install the fuse box coveCalibration beam |


Other information:
Kia Stinger (CK) 2018-2023 Service Manual: Rheostat
Components and components location Components Repair procedures Removal 1. Disconnect the negative (-) battery terminal. 2. Remove the crash pad lower panel. (Refer to Body - "Crash Pad Lower Panel") 3. Remove the crash pad garnish [LH] (A) after loosening the mounting screw.Kia Stinger (CK) 2018-2023 Service Manual: Auto Defogging Sensor (DATC only)
Description and operation Description Installed on the windshield glass, the auto defogging sensor judges and sends signal to blow out wind for defogging if moisture occurs. On receiving the signal from the sensor, the air conditioner control module restrains moisture and eliminates fog by controlling the intake actuator, A/C, auto defogging actuator, blower motor rpm, and mode actuator.Categories
- Manuals Home
- Kia Stinger Owners Manual
- Kia Stinger Service Manual
- New on site
- Most important about car

Copyright © 2026 www.kstinger.com 0.009