Kia Stinger CK: Heater / Auto Defoging Actuator
Description and operation
| Description |
Installed on the windshield glass, the auto defogging sensor judges and sends signal to blow out wind for defogging if moisture occurs. The air conditioner control module receives a signal from the sensor and restrains moisture and eliminates defog by the intake actuator, A/C, auto defogging actuator, blower motor rpm and mode actuator.
Repair procedures
| Inspection |
| 1. |
Turn the ignition switch OFF. |
| 2. |
Disconnect the auto defogging connector. |
| 3. |
Verify that the auto defogging actuator operates in the open position when connecting 12V to terminal 4 and grounding terminal 6. Verify that the auto defogging actuator operates in the closed position when connected in reverse.
|
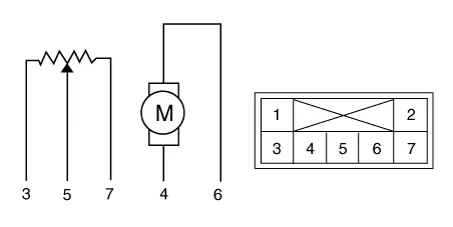
| 4. |
Connect the auto defogging actuator connector. |
| 5. |
Turn the ignition switch ON. |
| 6. |
Check the voltage between terminals 5 and 6. Specification
The current position of the actuator will be sent to the control unit. |
| 7. |
If the measured voltage is not within specification, substitute with a known-good auto defogging actuator and check for proper operation. |
| 8. |
Replace the auto defogging actuator if it is proved that there is a problem with it. |
| Replacement |
| 1. |
Disconnect the negative (-) battery terminal. |
| 2. |
Remove the glove box housing. (Refer to Body - "Glove Box Housing") |
| 3. |
Remove the passenger side shower duct (A) after loosening the screw.
|
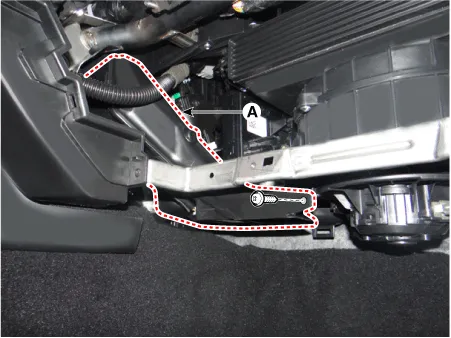
| 4. |
Remove the aspirator. |
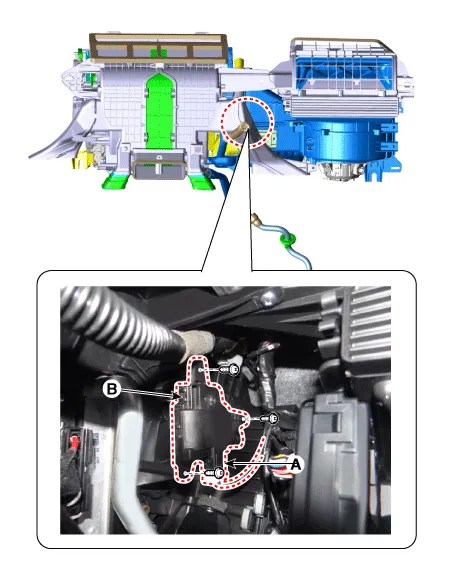
| 5. |
Disconnect the connector (A) and then remove the auto defogging actuator (B) after loosening the screws.
|
| 6. |
Install in the reverse order of removal.Heating, Ventilation And Air Conditioning |


Other information:
Kia Stinger (CK) 2018-2023 Service Manual: Emergency Signal System
Description and operation Description Introduction of quick brake warning system (ESS) In case of quick brake by driver, the brake lamp or turn signal is blinked to warn against the vehicle at rear. 1. Basic function (Blinking the brake lamp/emergency lamp) – Operation condition: In case of quick brake or operation of ABS above in a certain speed – Releasing condition: In case of stopping the quick brake or releasing the ABS operation 2.Kia Stinger (CK) 2018-2023 Service Manual: Inner panel fuse replacement
1. Turn the ignition switch and all other switches off. 2. Open the fuse panel cover. If the switch is located in the “OFF” position, a caution indicator will be displayed in the cluster. 3. Pull the suspected fuse straight out. Use the removal tool provided on the engine compartment fuse panel cover. 4. Check the removed fuse; replace it if it is blown.Categories
- Manuals Home
- Kia Stinger Owners Manual
- Kia Stinger Service Manual
- New on site
- Most important about car
