Kia Stinger CK: Heater / Console Temperature Control Actuator
Repair procedures
| Inspection |
| 1. |
Turn the ignition switch OFF. |
| 2. |
Disconnect the mode control actuator connector. |
| 3. |
Verify that the mode control actuator operates to the defrost mode when 12V is connected to terminal 3 and ground to terminal 7. Verify that the mode control actuator operates to the vent mode when connected in reverse.
|

| 4. |
Connect the mode control actuator connector. |
| 5. |
Turn the ignition switch ON. |
| 6. |
Check the voltage between terminals 5 and 4. Specification
The current position of the actuator will be sent to the control unit. |
| 7. |
If the measured voltage is not within the specification, substitute with a verified temperature control actuator and check for proper operation. |
| 8. |
Replace the mode control actuator if it is proved that there is a problem with it. |
| Replacement |
| 1. |
Disconnect the negative (-) battery terminal. |
| 2. |
Remove the knee airbag. (Refer to Restraint - "Knee Airbag (KAB) Module") |
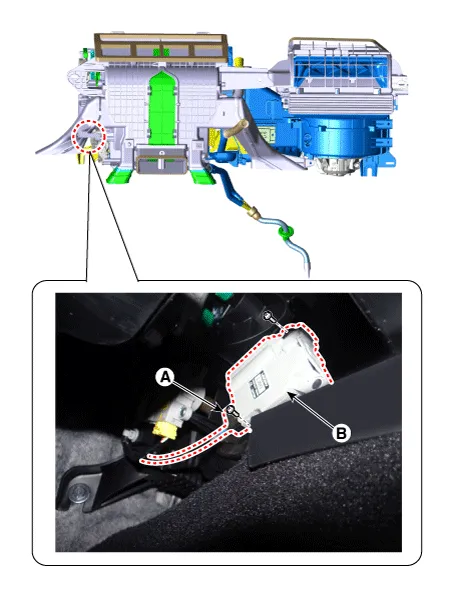
| 3. |
Disconnect the connector (A) and then remove the temperature control actuator (B) after loosening the mounting screws.
|
| 4. |
Install in the reverse order of removal. |


Other information:
Kia Stinger (CK) 2018-2023 Service Manual: Occupant Detection System (ODS)
Your vehicle is equipped with an occupant detection system in the front passenger's seat. The occupant detection system is designed to detect the presence of a properly-seated front passenger and determine if the passenger's front air bag should be enabled (may inflate) or not. Only the front passenger front air bag is controlled by the Occupant Detection System.Kia Stinger (CK) 2018-2023 Service Manual: Purge Control Solenoid Valve (PCSV)
Specifications Specification Item Specification Coil Resistance (Ω) 18.5 - 22.5 [20°C(68°F)] Description and operation Description Installed on the surge tank, the Purge Control Solenoid Valve (PCSV) controls the passage between the canister and the intake manifold.Categories
- Manuals Home
- Kia Stinger Owners Manual
- Kia Stinger Service Manual
- New on site
- Most important about car
