Kia Stinger CK: Heater / Console ON/OFF Actuator
Repair procedures
| Inspection |
| 1. |
Turn the ignition switch OFF. |
| 2. |
Disconnect the mode control actuator connector. |
| 3. |
Verify that the mode control actuator operates to the defrost mode when 12V is connected to terminal 3 and ground to terminal 7. Verify that the mode control actuator operates to the vent mode when connected in reverse.
|

| 4. |
Connect the mode control actuator connector. |
| 5. |
Turn the ignition switch ON. |
| 6. |
Check the voltage between terminals 5 and 6. Specification
The current position of the actuator will be sent to the control unit. |
| 7. |
If the measured voltage is not within the specification, substitute with a verified temperature control actuator and check for proper operation. |
| 8. |
Replace the mode control actuator if it is proved that there is a problem with it. |
| Replacement |
| 1. |
Disconnect the negative (-) battery terminal. |
| 2. |
Remove the knee airbag. (Refer to Restraint - "Knee Airbag (KAB) Module") |
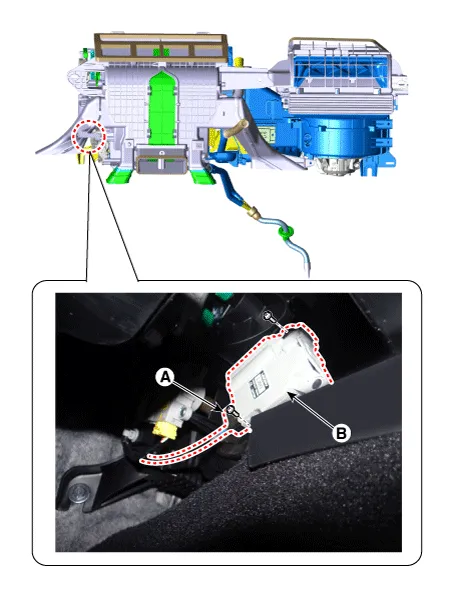
| 3. |
Disconnect the connector (A) and then remove the temperature control actuator (B) after loosening the mounting screws.
|
| 4. |
Install in the reverse order of removal. |

Other information:
Kia Stinger (CK) 2018-2023 Service Manual: Knee Airbag (KAB) Module
Description and operation Description Installed inside the crash pad, the knee airbag (KAB) protects the driver in the event of a frontal crash. The SRSCM determines if and when to deploy the KAB. Never attempt to measure the circuit resistance of the airbag module (squib) even if you are using a specified tester.Kia Stinger (CK) 2018-2023 Service Manual: 27 Brake Control Solenoid Valve (27/B_VFS)
Specifications Specifications Item Specification Control type N/L (Normal Low) Control pressure kpa (kgf/cm², psi) 0 - 1,569.06 (0 - 16, 0 - 227.57) Current (mA) 0 - 1,100 Coil resistance (Ω) 5.Categories
- Manuals Home
- Kia Stinger Owners Manual
- Kia Stinger Service Manual
- New on site
- Most important about car
