Kia Stinger CK: Blower / Field Effect Transistor (DATC)
Repair procedures
| Inspection |
| 1. |
Turn the ignition switch ON. |
| 2. |
Manually operate the control switch and measure the voltage of the blower motor. |
| 3. |
Operate the control switch to raise the voltage up to high speed.
Specification
|
|||||||||||||||||||||||||||

| 4. |
If the measured voltage is not within specification, substitute with a known-good field effect transistor and check for proper operation. |
| 5. |
Replace the field effect transistor if it is proved that there is a problem with it. |
| Replacement |
| 1. |
Disconnect the negative (-) battery terminal. |
| 2. |
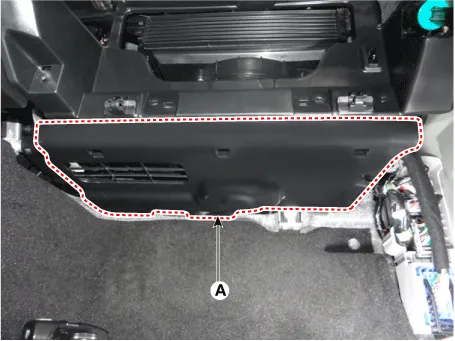
Remove the crash pad under cover [RH] (A).
|
| 3. |
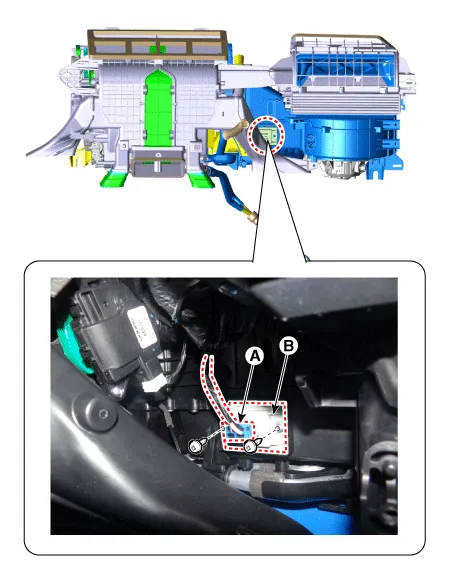
Disconnect the connector (A) and then remove the field effect transistor (B) after loosening the mounting screws.
|
| 4. |
Install in the reverse order of removal. |


Other information:
Kia Stinger (CK) 2018-2023 Service Manual: Integrated Memory Seat (IMS) Unit
Components and components location Components Connector Pin Information No Connector A Connector B Connector C 1 Cushion extension motor (Front) Battery (+) Slide switch (Front) 2 Recline motor (Front) Ground Recline switch (Front) 3 Rear height motor (Up) Battery (+) FIf your vehicle is equipped with a sunroof, you can slide or tilt your sunroof with the sunroof control lever located on the overhead console. The sunroof can be operated for approximately 30 seconds after the Engine Start/Stop button is in the OFF position. However, if the driver’s door is opened, the sunroof cannot be operated even within the 30 second period.Categories
- Manuals Home
- Kia Stinger Owners Manual
- Kia Stinger Service Manual
- New on site
- Most important about car
