Kia Stinger CK: Audio / Speakers
Repair procedures
| Inspection |
| Troubleshooting of the speakers |
When handling the speakers :
|

| 1. |
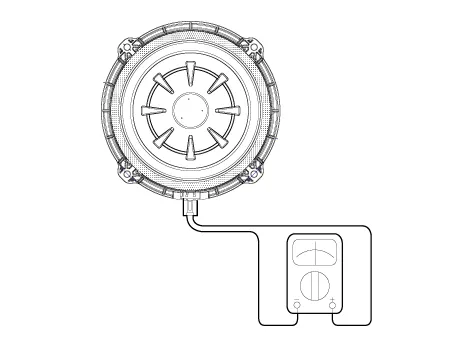
Basic inspection Loosen the screws to rule out the interference from the body trims and surrounding parts and then remove the speaker. After removing the speaker, check the sound quality of the speaker with the connector plugged in. |
| 2. |
Inspection for each cause
|

| Removal |
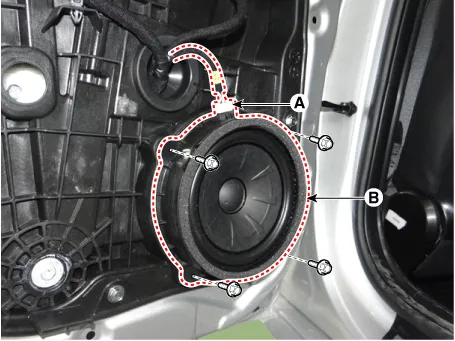
Front Door Speaker
| 1. |
Disconnect the negative (-) battery terminal. |
| 2. |
Remove the front door trim. (Refer to Body - "Front Door Trim") |
| 3. |
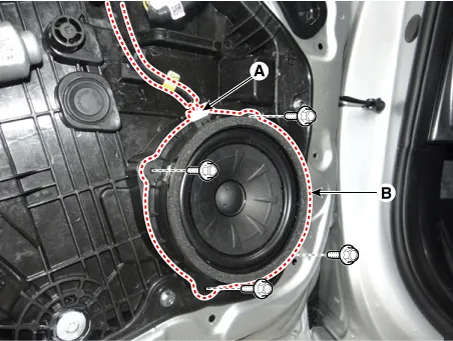
Remove the front door speaker (B) after disconnecting the connector (A) and loosening the bolts.
|
Front Tweeter Speaker
| 1. |
Disconnect the negative (-) battery terminal. |
| 2. |
Remove the front door trim. (Refer to Body - "Front Door Trim") |
| 3. |
Disconnect the front tweeter speaker connector (A).
|
| 4. |
Remove the front tweeter speaker (A) after loosening the mounting screws.
|
Front Midrange Speaker
| 1. |
Disconnect the negative (-) battery terminal. |
| 2. |
Remove the front door trim. (Refer to Body - "Front Door Trim") |
| 3. |
Remove the front midrange speaker (B) after disconnecting the connector (A) and loosening the mounting screws.
|
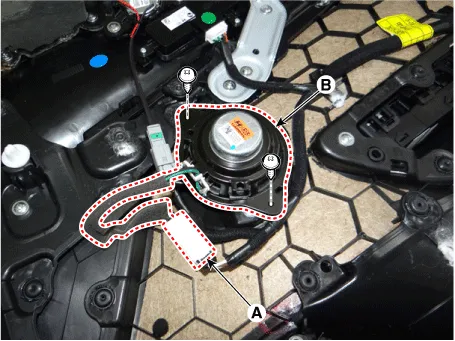
Rear Door Speaker
| 1. |
Disconnect the negative (-) battery terminal. |
| 2. |
Remove the rear door trim. (Refer to Body - "Rear Door Trim") |
| 3. |
Remove the rear door speaker (B) after disconnecting the connector (A) and loosening the mounting bolts.
|
Rear Tweeter Speaker
| 1. |
Disconnect the negative (-) battery terminal. |
| 2. |
Remove the rear door trim. (Refer to Body - "Rear Door Trim") |
| 3. |
Remove the rear tweeter speaker (B) after disconnecting the connector (A) and loosening the mounting screws.
|

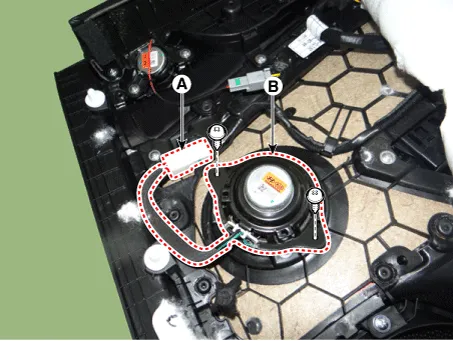
Rear Midrange Speaker
| 1. |
Disconnect the negative (-) battery terminal. |
| 2. |
Remove the rear door trim. (Refer to Body - "Rear Door Trim") |
| 3. |
Remove the rear midrange speaker (B) after disconnecting the connector (A) and loosening the mounting screws.
|
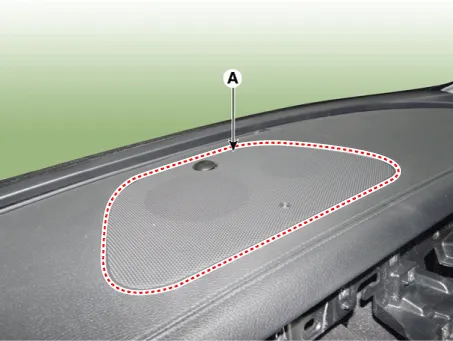
Crash Pad Center Speaker
Be careful not to scratch the crash pad and related parts |
| 1. |
Disconnect the negative (-) battery terminal. |
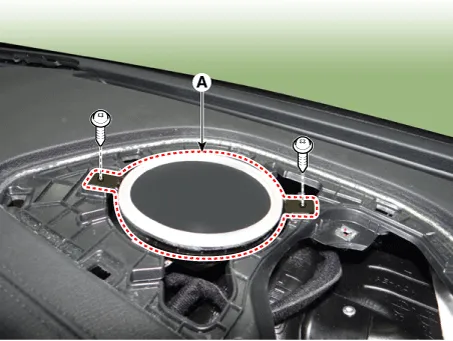
| 2. |
Using a scraper or remover, remove the crash pad center speaker grille (A).
|
| 3. |
Disconnect the security connector (A) and auto light & photo sensor connector (B).
|
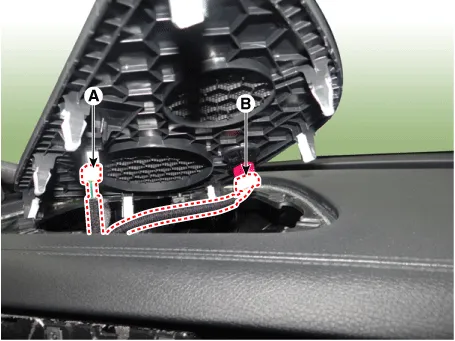
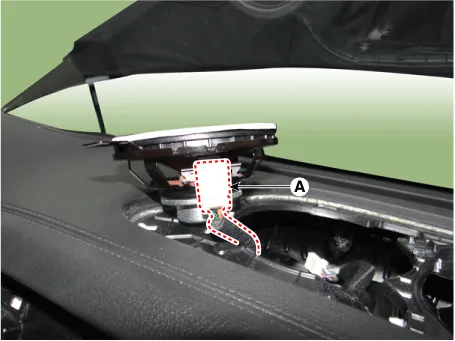
| 4. |
Remove the crash pad center speaker (A) after loosening the mounting screws.
|
| 5. |
Disconnect the crash pad center speaker connector (A).
|
Sub Woofer Speaker
| 1. |
Disconnect the negative (-) battery terminal. |
| 2. |
Remove the floor carpet. (Refer to Body - "Floor Carpet") |
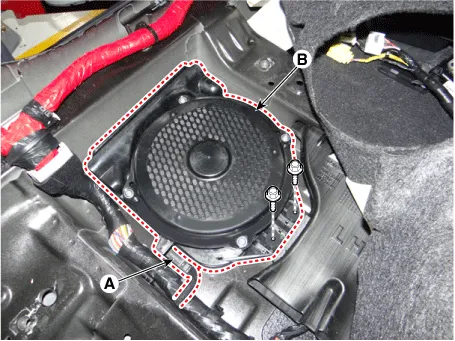
| 3. |
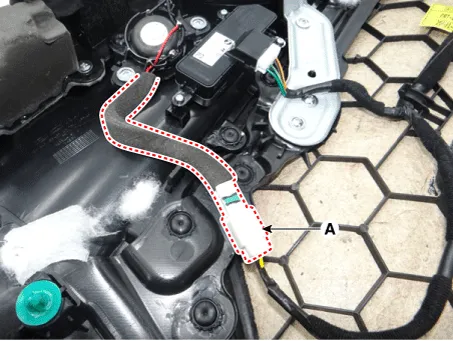
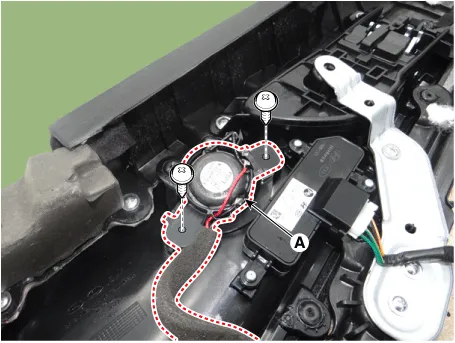
Remove the sub woofer speaker (B) after disconnecting the connector (A) and loosening the mounting bolts.
|
| Installation |
Front Door Speaker
| 1. |
Install the front door speaker. |
| 2. |
Install the front door trim. |
| 3. |
Connect the negative (-) battery terminal. |
Front Tweeter Speaker
| 1. |
Install the front tweeter speaker. |
| 2. |
Install the front door trim. |
| 3. |
Connect the negative (-) battery terminal. |
Front Midrange Speaker
| 1. |
Install the front midrange speaker. |
| 2. |
Install the front door trim. |
| 3. |
Connect the negative (-) battery terminal. |
Rear Door Speaker
| 1. |
Install the rear door speaker. |
| 2. |
Install the rear door trim. |
| 3. |
Connect the negative (-) battery terminal. |
Rear Tweeter Speaker
| 1. |
Install the rear tweeter speaker. |
| 2. |
Install the rear door trim. |
| 3. |
Connect the negative (-) battery terminal. |
Rear Midrange Speaker
| 1. |
Install the rear Midrange speaker. |
| 2. |
Install the rear door trim. |
| 3. |
Connect the negative (-) battery terminal. |
Crash Pad Center Speaker
| 1. |
Install the crash pad center speaker. |
| 2. |
Connect the security connector and auto light & photo sensor connector. |
| 3. |
Install the crash pad center speaker grille. |
| 4. |
Connect the negative (-) battery terminal. |
Sub Woofer Speaker
| 1. |
Install the sub woofer speaker. |
| 2. |
Install the floor carpet. |
| 3. |
Connect the negative (-) battery terminal. |


Other information:
Kia Stinger (CK) 2018-2023 Service Manual: 4&OD Clutch Control Solenoid Valve (4&OD/C_VFS)
Specifications Specifications Item Specification Control type N/H (Normal High) Control pressure kpa (kgf/cm², psi) 0 - 1,569.06 (0 - 16, 0 - 227.57) Current (mA) 0 - 1,100 Coil resistance (Ω) 5.Repair procedures Replacement 1. Remove the crankshaft damper pulley. (Refer to Drive Belt System - "Crankshaft Damper Pulley") 2. Remove the front oil seal (A). 3. Install the new front oil seal. (1) Apply engine oil on the edge of new front oil seal.Categories
- Manuals Home
- Kia Stinger Owners Manual
- Kia Stinger Service Manual
- New on site
- Most important about car
