Kia Stinger CK: Heater / Temperature Control Actuator
Description and operation
| Description |
The heater unit consists of mode control actuator and temperature control actuator.
Located in the heater unit, the temperature control actuator regulates the temperature in the following procedures.
Signal from control unit adjusts the position of the temperature door by operating the temperature switch. Then the temperature will be regulated by the hot/cold air ratio decided by the position of the temperature door.
Repair procedures
| Inspection |
| 1. |
Turn the ignition switch OFF. |
| 2. |
Disconnect the temperature control actuator connector. |
| 3. |
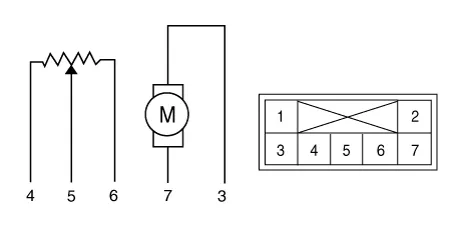
Verify that the temperature control actuator operates to the cool position when 12V is connected to terminal 3 and ground to terminal 7. Verify that the temperature control actuator operates to the warm position when connected in reverse.
|
| 4. |
Connect the temperature control actuator connector. |
| 5. |
Turn the ignition switch ON. |
| 6. |
Check the voltage between terminals 5 and 4. Specification
The current position of the actuator will be sent to the control unit. |
| 7. |
If the measured voltage is not within the specification, substitute with a verified temperature control actuator and check for proper operation. |
| 8. |
Replace the temperature control actuator if it is proved that there is a problem with it. |
| Replacement |
| [Driver side] |
| 1. |
Disconnect the negative (-) battery terminal. |
| 2. |
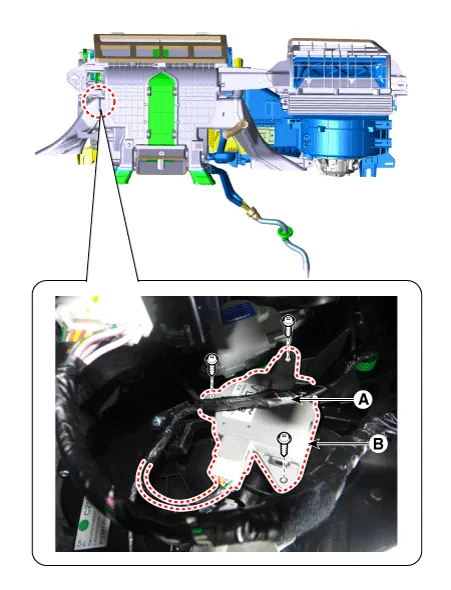
Remove the knee airbag. (Refer to Restraint - "Knee Airbag (KAB) Module") |
| 3. |
Disconnect the connector (A) and then remove the temperature control actuator (B) after loosening the mounting screws.
|
| 4. |
Install in the reverse order of removal. |
| [Passenger side] |
| 1. |
Disconnect the negative (-) battery terminal. |
| 2. |
Remove the glove box housing. (Refer to Body - "Glove Box Housing") |
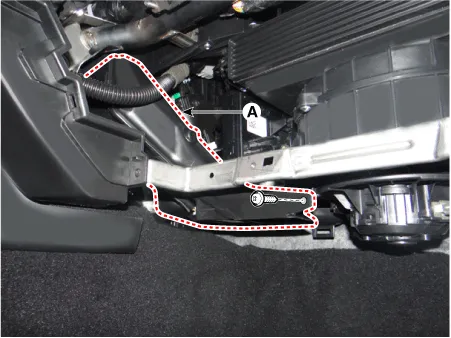
| 3. |
Remove the passenger side showe duct (A) after loosening the screw.
|
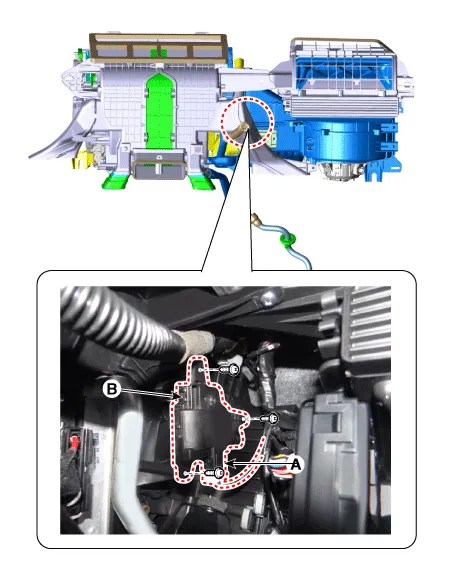
| 4. |
Disconnect the connector (A) and then remove the temperature control actuator (B) after loosening the screws.
|
| 5. |
Install in the reverse order of removal. |


Other information:
Kia Stinger (CK) 2018-2023 Service Manual: Integrated HomeLink® Wireless Control System
The HomeLink® Wireless Control System provides a convenient way to replace up to three hand-held radiofrequency (RF) transmitters with a single built-in device. This innovative feature will learn the radio frequency codes of most current transmitters to operate devices such as gate operators, garage door openers, entry door locks, security systems, even home lighting.Description and operation Description 1. Function • By detecting the pressure, temperature, acceleration, and battery condition, transmit information to ECU by a wireless RF. • Wheel location is recognized by comparing the Wheel Pulse of ECS (ABS) and acceleration values of the sensor (High Line).Categories
- Manuals Home
- Kia Stinger Owners Manual
- Kia Stinger Service Manual
- New on site
- Most important about car
