Kia Stinger CK: Features of your vehicle / Instrument cluster
Contents:
■ Type A

■ Type B
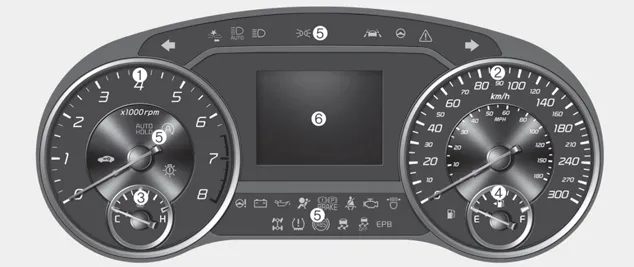
1. Tachometer
2. Speedometer
3. Engine coolant temperature gauge
4. Fuel gauge
5. LCD display
6.Warning and indicator lights
Instrument Cluster Control
Adjusting Instrument Cluster Illumination
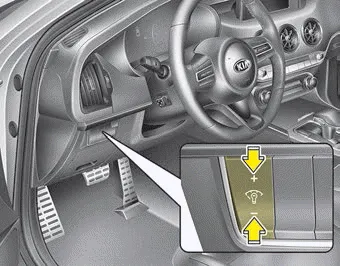
The brightness of the instrument panel illumination is changed by pressing the illumination control button (“+” or “-”) when the Engine Start/Stop button is ON, or the taillights are turned on.
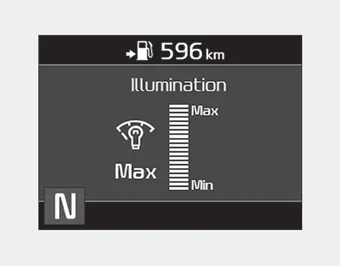
- If you hold the illumination control button (“+” or “-”), the brightness will be changed continuously.
- If the brightness reaches to the maximum or minimum level, an alarm will sound.
LCD Display Control
■ Type A

■ Type B
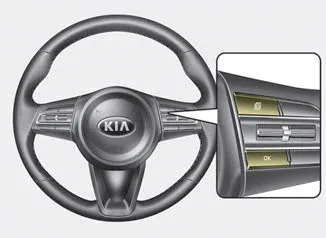
The LCD display modes can be changed by using the control buttons on the steering wheel.
(1)
 : MODE button for changing modes
(2)
 /OK : SELECT scroll switch for setting
the selected item and RESET scroll switch for resetting items
/OK : SELECT scroll switch for setting
the selected item and RESET scroll switch for resetting items
❈ For the LCD modes, refer to “LCD Window” in this chapter.
Gauges ➤
Transaxle Shift Indicator
Automatic Transaxle Shift Indicator
![]()
This indicator displays which automatic transaxle shift lever is selected.
- Park :P
- Reverse : R
- Neutral : N
- Drive :D
- Sports Mode : 1, 2, 3, 4, 5, 6, 7, 8


Other information:
Kia Stinger (CK) 2018-2023 Owner's Manual: Front Disc Brake
Components and components location Components [Standard] 1. Caliper housing 2. Brake member 3. Brake pad assembly [IN] 4. Retainer 5. Brake pad assembly [OUT] 6. Brake pad return spring [Brembo] 1. Caliper housing 2. Brake pad cover 3. Brake pad 4.Kia Stinger (CK) 2018-2023 Owner's Manual: Evaporator Temperature Sensor
Description and operation Description The evaporator temperature sensor detects the evaporator core temperature and interrupts compressor relay power in order to prevent evaporator from freezing by excessive cooling. Repair procedures Inspection 1. Turn the ignition switch OFF. 2. Disconnect the evaporator temperature sensor connector.Categories
- Manuals Home
- Kia Stinger Owners Manual
- Kia Stinger Service Manual
- New on site
- Most important about car
Contents
