
Kia Stinger CK: ISG (Idle Stop & Go) System / ISG OFF switch
Description and operation
| Description |
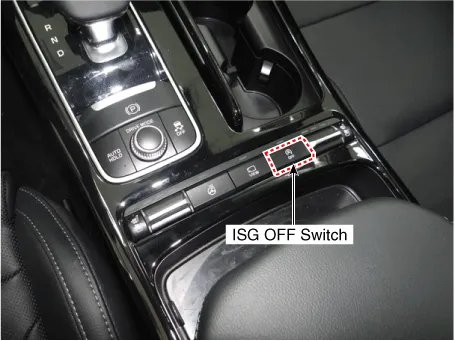
The ISG OFF switch on the floor console can be used to deactivate the ISG function.
Repair procedures
| Removal |
Put on gloves to protect your hands. |

|

| 1. |
Disconnect the negative (-) battery terminal. |
| 2. |
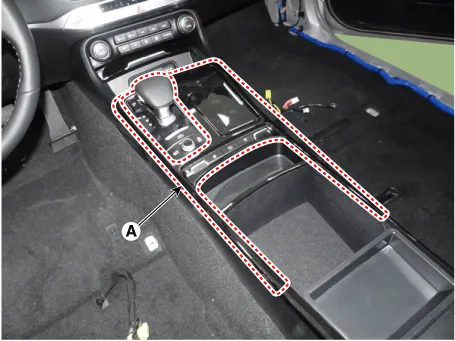
Remvoe the console upper complete (A) by using a remover.
|
| 3. |
Disconnect the connectors (A) from the console upper complete.
|

| 4. |
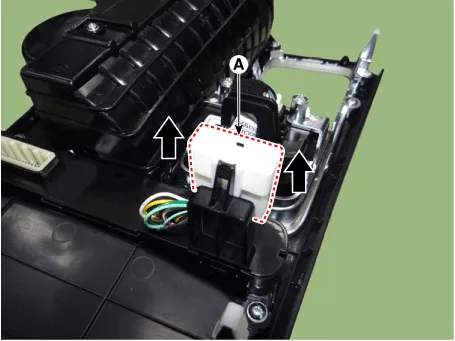
Remove the connector (A) from the console floor switch complete.
|
| 5. |
Remove the console floor switch complete (A) after loosening the mounting screws.
|

| Installation |
| 1. |
Install the console floor switch complete. |
| 2. |
Install the connector from the console floor switch complete. |
| 3. |
Connect the connectors from the console upper complete. |
| 4. |
Install the console upper complete. |
| 5. |
Connect the negative (-) battery terminal. |
|


Other information:
Kia Stinger (CK) 2018-2023 Service Manual: Head Up Display (HUD) System
Components and components location Components Location 1. Head Up Display (HUD) 2. Ambient light sensor 3. Cluster (User setting menu ON/OFF, Display brightness) Description and operation Description 1. System operation HUD system displays various information on the windshield glass which minimizes the driver’s eye movement to enhance safety and convenience.Kia Stinger (CK) 2018-2023 Service Manual: Engine And Transmission Assembly
Repair procedures Removal and Installation • Use fender covers to avoid damaging painted surfaces. • To avoid damage, unplug the wiring connectors carefully while holding the connector portion.Categories
- Manuals Home
- Kia Stinger Owners Manual
- Kia Stinger Service Manual
- New on site
- Most important about car
