
Kia Stinger CK: Engine Mechanical System / Cylinder Head Assembly
Contents:
Components and components location
| Components |
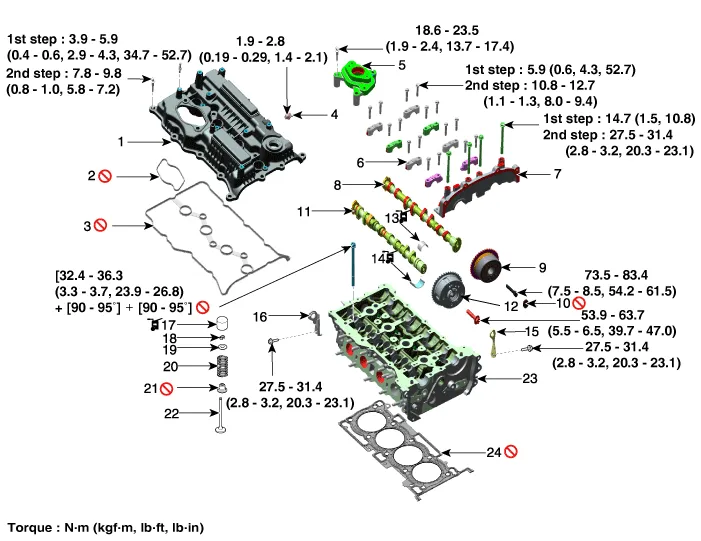
| 1. Cylinder head cover
2. Fuel pump bracket gasket 3. Cylinder head cover gasket 4. Positive Crankcase Ventilation (PCV) valve 5. Fuel pump bracket 6. Camshaft bearing cap 7. Camshaft front bearing cap 8. Intake camshaft |
9. Intake E-CVVT assembly
10. E-CVVT plug 11. Exhaust camshaft 12. Exhaust CVVT assembly 13. Exhaust camshaft upper bearing 14. Exhaust camshaft lower bearing 15. Front engine hanger 16. Rear engine hanger |
17. Mechanical lash adjuster
(MLA) 18. Retainer lock 19. Retainer 20. Valve spring 21. Valve stem seal 22. Valve 23. Cylinder head 24. Cylinder head gasket |
Valve clearance inspection and adjustment
| Valve Clearance Inspection And Adjustment |
In case of removing the high pressure fuel pump, high pressure fuel pipe, delivery pipe, and injector, there may be injury caused by leakage of the high pressure fuel. So don’t do any repair work right after engine stops. |

Inspect and adjust the valve clearance when the engine is cold (Engine coolant temperature : 20°C (68°F)) and cylinder head is installed on the cylinder block. |

| 1. |
Remove the cylinder head cover. (Refer to Cylinder Head Assembly - "Cylinder Head Cover") |
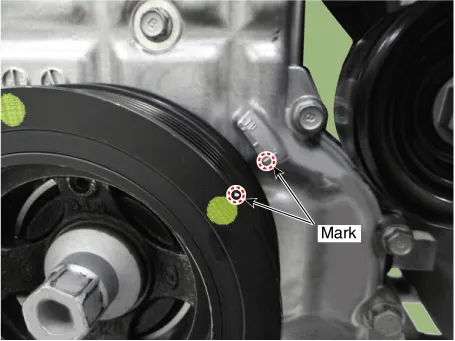
| 2. |
Set No.1 cylinder to TDC/compression.
|

| 3. |
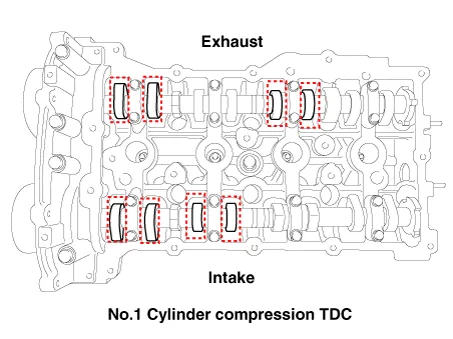
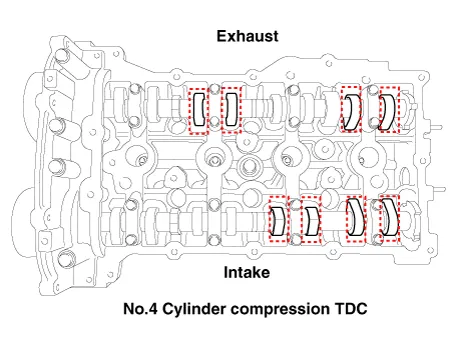
Inspect the valve clearance.
|
| 4. |
Adjust the intake and exhaust valve clearance.
|
Cylinder Head Cover ➤
CVVT & Camshaft ➤
Cylinder Head ➤


Other information:
Kia Stinger (CK) 2018-2023 Service Manual: Integrated Memory Seat (IMS) Unit
Components and components location Components Connector Pin Information No Connector A Connector B Connector C 1 Cushion extension motor (Front) Battery (+) Slide switch (Front) 2 Recline motor (Front) Ground Recline switch (Front) 3 Rear height motor (Up) Battery (+) FKia Stinger (CK) 2018-2023 Service Manual: Power Window Motor
Components and components location Components [Safety Window Motor] [Standard Window Motor] Repair procedures Removal • When removing with a flat-tip screwdriver or remover, wrap protective tape around the tools to prevent damage to components.Categories
- Manuals Home
- Kia Stinger Owners Manual
- Kia Stinger Service Manual
- New on site
- Most important about car
Contents
