
Kia Stinger CK: Headlamp Leveling System / Headlamp Leveling Switch (Manual)
Kia Stinger (CK) 2018-2023 Service Manual / Body Electrical System / Headlamp Leveling System / Headlamp Leveling Switch (Manual)
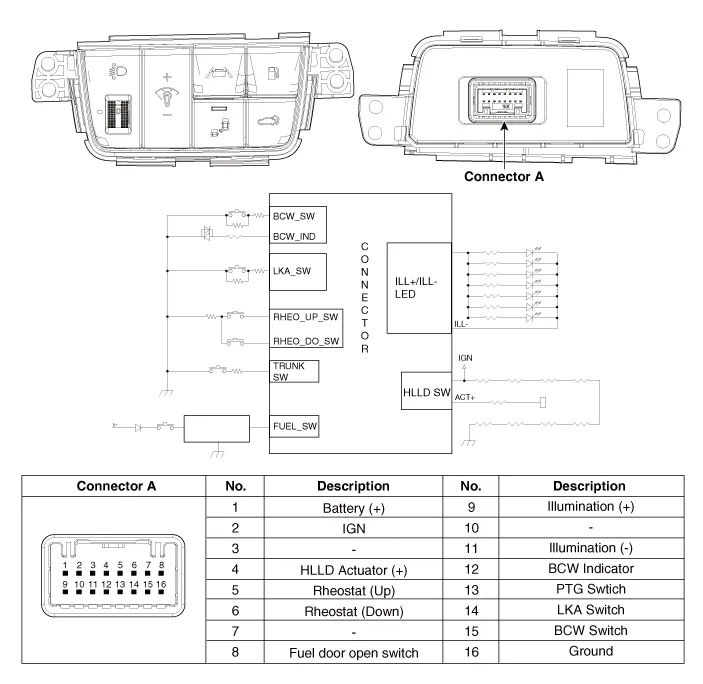
Schematic diagrams
| Circuit Diagram |
Repair procedures
| Removal |
| 1. |
Disconnect the negative (-) battery terminal. |
| 2. |
Remove the crash pad lower panel. (Refer to Body - "Crash Pad Lower Panel") |
| 3. |
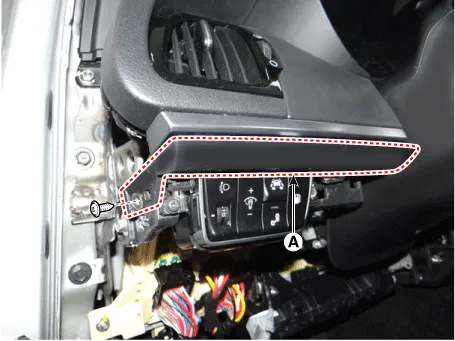
Remove the crash pad garnish [LH] (A) after loosening the mounting screw.
|
| 4. |
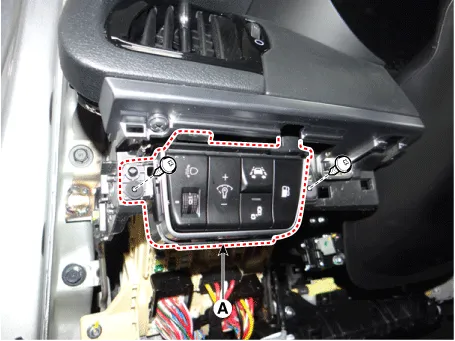
Remove the side crash pad switch (A) after loosening the mounting screws.
|
| 5. |
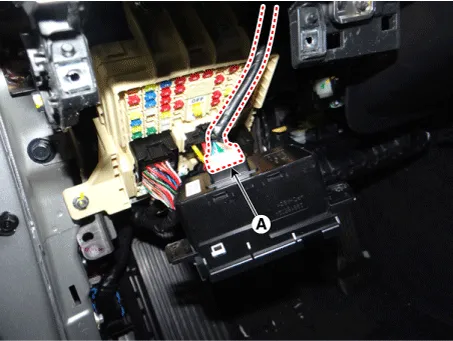
Disconnect the side crash pad switch connector (A).
|
| Installation |
| 1. |
Connect the side crash pad switch connector. |
| 2. |
Install the side crash pad switch. |
| 3. |
Install the crash pad garnish [LH]. |
| 4. |
Install the crash pad lower panel. |
| 5. |
Connect the negative (-) battery terminal. |


Other information:
Kia Stinger (CK) 2018-2023 Service Manual: Assist Handle
Components and components location Component Location 1. Assist handle Repair procedures Replacement Put on gloves to protect your hands. • Use a plastic panel removal tool to remove interior trim pieces without marring the surface.Kia Stinger (CK) 2018-2023 Service Manual: Seat Ventilation Unit
Components and components location Component Location 1. Seat ventilation blower 2. Seat ventilation unit (Assist seat only) Schematic diagrams Circuit Diagram Repair procedures Removal Seat Ventilation Unit 1. Disconnect the negative (-) battery terminal.Categories
- Manuals Home
- Kia Stinger Owners Manual
- Kia Stinger Service Manual
- New on site
- Most important about car

Copyright © 2026 www.kstinger.com 0.0101