Kia Stinger CK: Lighting System / Rheostat
Components and components location
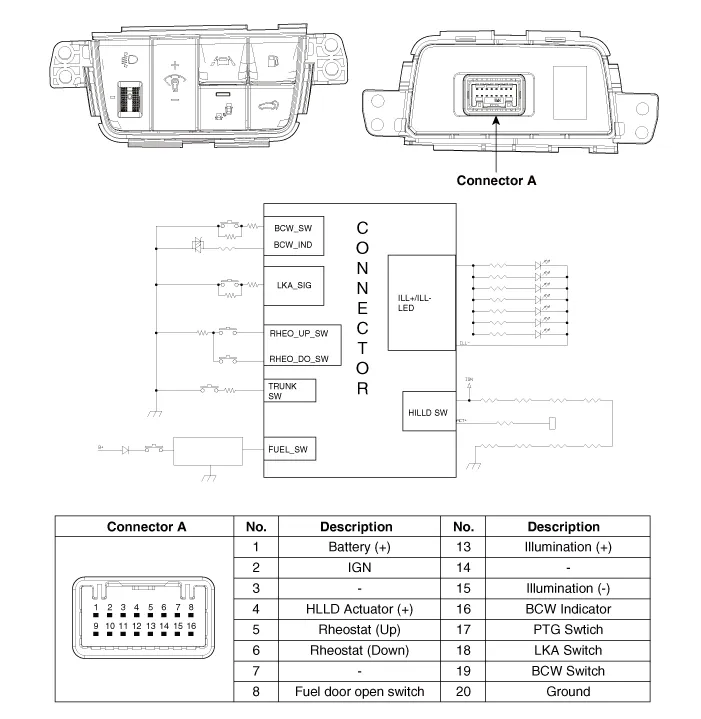
| Components |
Repair procedures
| Removal |
| 1. |
Disconnect the negative (-) battery terminal. |
| 2. |
Remove the crash pad lower panel. (Refer to Body - "Crash Pad Lower Panel") |
| 3. |
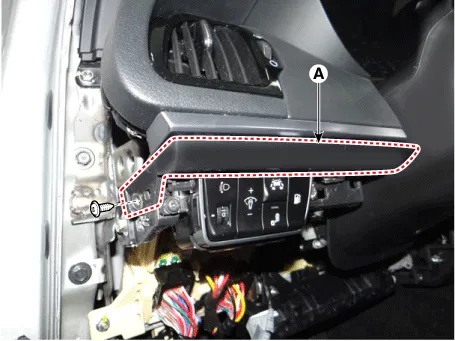
Remove the crash pad garnish [LH] (A) after loosening the mounting screw.
|
| 4. |
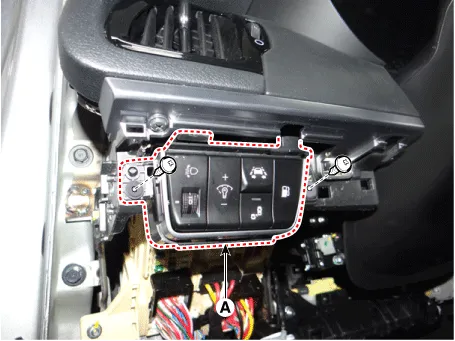
Remove the side crash pad switch (A) after loosening the mounting screws.
|
| 5. |
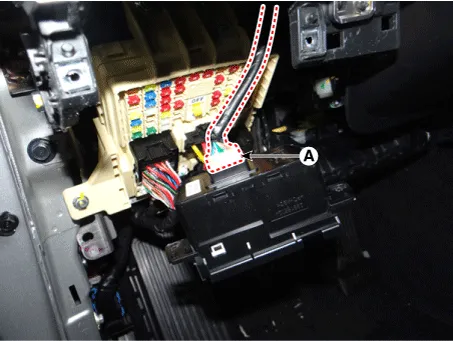
Disconnect the side crash pad switch connector (A).
|
| Installation |
| 1. |
Connect the side crash pad switch connector. |
| 2. |
Install the side crash pad switch. |
| 3. |
Install the crash pad garnish [LH]. |
| 4. |
Install the crash pad lower panel. |
| 5. |
Connect the negative (-) battery terminal. |
| Inspection |
| 1. |
Check for intensity of new rheostat switch. If the light intensity of the lamps changes smoothly without any flickering when the rheostat is turned, it can be assumed that the rheostat is normal.
|


Other information:
Kia Stinger (CK) 2018-2023 Service Manual: Power Seat Control Switch
Repair procedures Inspection Diagnosis With KDS 1. The body electrical system can be quickly diagnosed for failed parts by using the vehicle diagnostic system (KDS). The diagnostic system (KDS) provides the following information. (1) Self diagnosis : Checks and displays the failure code (DTC).Kia Stinger (CK) 2018-2023 Service Manual: Camshaft Position Sensor (CMPS)
Specifications Specifications Item Specification Air Cap (mm) 0.2 - 2.0 Description and operation Description Camshaft Position Sensor (CMPS) is a hall sensor, which detects the camshaft position by using a hall element. It is related with Crankshaft Position Sensor (CKPS) and detects the piston position of each cylinder which cannot be detected by the CKPS.Categories
- Manuals Home
- Kia Stinger Owners Manual
- Kia Stinger Service Manual
- New on site
- Most important about car
