Kia Stinger CK: Brake System / Brake System
Kia Stinger (CK) 2018-2023 Service Manual / Brake System / Brake System
Contents:
- Brake Booster
- Vacuum Pump
- Master Cylinder
- Brake Line
- Brake Pedal
- Front Disc Brake
- Rear Disc Brake
- Stop Lamp Switch
Repair procedures
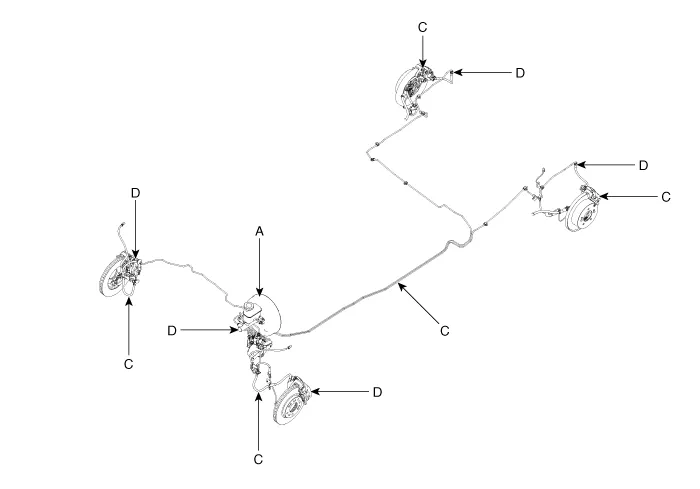
| Operation and Leakage Check |
Check all of the following items:
|
Component |
Procedure |
|
|
Brake Booster (A) |
Check brake operation by applying the brakes during a test drive. If the
brakes do not work properly, check the brake booster. Replace the brake
booster as an assembly if it does not work properly or if there are signs
of leakage. |
|
|
Piston cup and pressure cup inspection (B) |
• Check brake operation by applying the brakes. Look for damage or signs
of fluid leakage. Replace the master cylinder as an assembly if the pedal
does not work properly or if there is damage or signs of fluid leakage.
• Check for a difference in brake pedal stroke between quick and slow brake applications. Replace the master cylinder if there is a difference in pedal stroke. |
|
|
Brake hoses (C) |
Look for damage or signs of fluid leakage. Replace the brake hose with a
new one if it is damaged or leaking. |
|
|
Caliper piston seal and piston boots (D) |
Check brake operation by applying the brakes. Look for damage or signs of fluid leakage. If the pedal does not work properly, the brakes drag, or there is damage or signs of fluid leakage, disassemble and inspect the brake caliper. Replace the boots and seals with new ones whenever the brake caliper is disassembled. |
|
Brake Booster ➤
Vacuum Pump ➤
Master Cylinder ➤
Brake Line ➤
Brake Pedal ➤
Front Disc Brake ➤
Rear Disc Brake ➤
Stop Lamp Switch ➤


Other information:
Kia Stinger (CK) 2018-2023 Service Manual: Electric Power Steering
Description and operation Description EPS (Electric power steering, Column assist type) system is an engine operation independent steering system that uses an electric motor to assist the steering force. EPS control module controls the motor operation based on input signals from torque sensor and steering angle sensor via CAN (Controller Area Network), resulting in a more precise and timely control of steering assist thatn conventional engine-driven hydraulic systems.General market Normal Maintenance Schedule - Except Europe (Including Russia) The following maintenance services must be performed to ensure good emission control and performance. Keep receipts for all vehicle emission services to protect your warranty. Where both mileage and time are shown, the frequency of service is determined by whichever occurs first.Categories
- Manuals Home
- Kia Stinger Owners Manual
- Kia Stinger Service Manual
- Brake Booster
- Vacuum Pump
- Master Cylinder
- Brake Line
- Brake Pedal
- Front Disc Brake
- Rear Disc Brake
- Stop Lamp Switch
- New on site
- Most important about car
Contents

Copyright © 2026 www.kstinger.com 0.0085